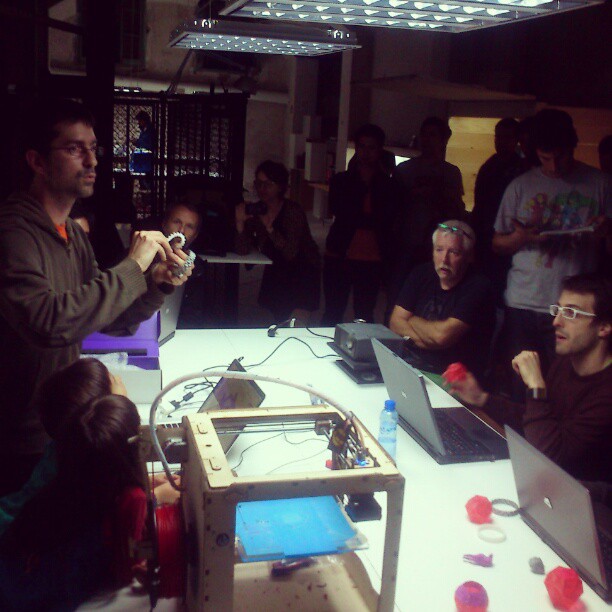
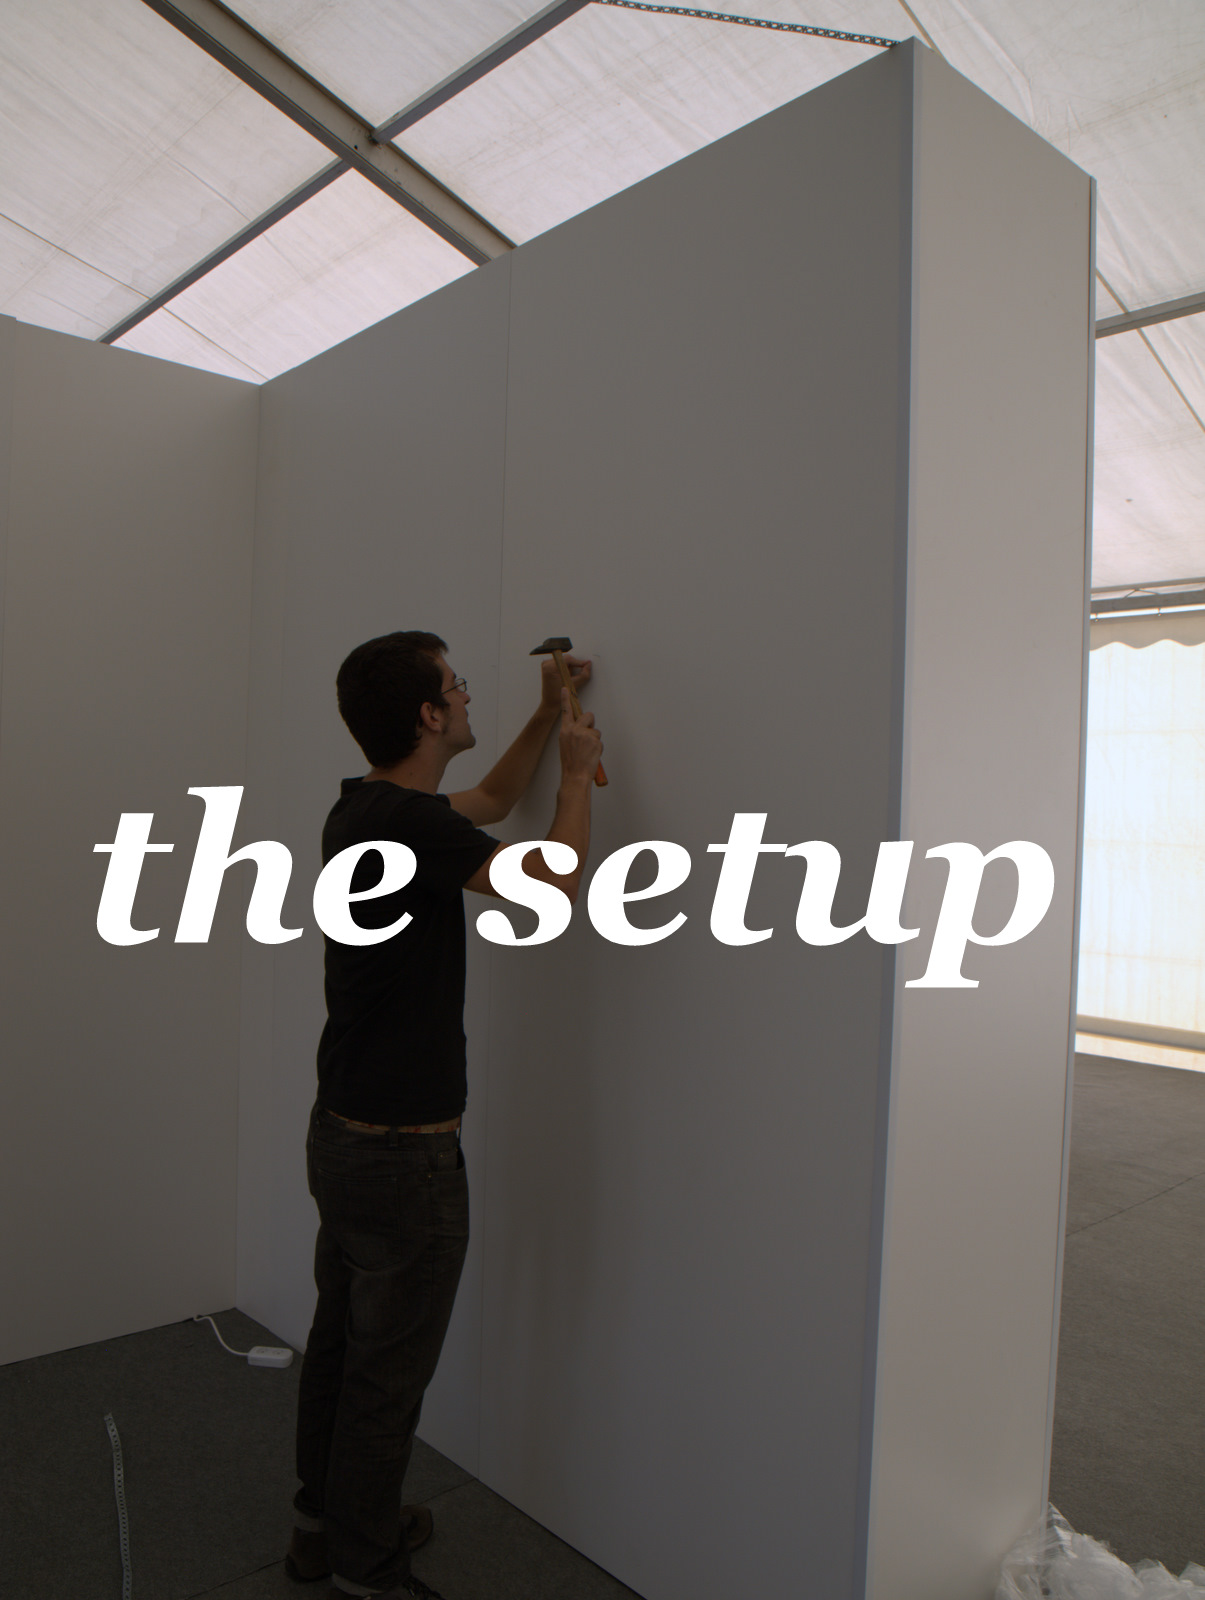
MADE makerspace | Workshop
Hands-on workshop on design for 3D Printing, held at the MADE MakerSpace in Barcelona.
As part of a series of events being held at the MADE MakerSpace at the basement of Makers of Barcelona, Cunicode gave a hands-on workshop on design for 3D Printing, where participants played with Sketchup to build a customized lego brick and printed it with a DIY 3D Printer.


Do you want to try? Find the brick in Sketchup format here: http://bit.ly/brick_sk

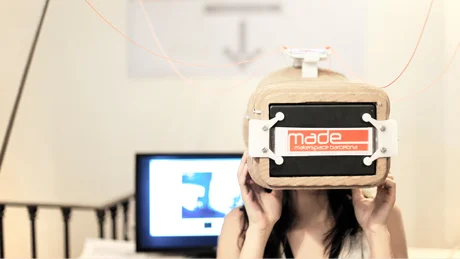
MADE is a flexible space designed for artists, designers, inventors, entrepreneurs, creatives, engineers, makers, and hackers fabbers to develop their own projects. Organized to facilitate the development of an open distributed learning community, co-production and entrepreneurial activities.
MADE is located in the basement of the MOB: Makers of Barcelona a co-working space located in the c / Bailen 11 within walking distance of the Arc de Triomf station metro L1, the L2 Tetuan metro station and train central North bus station.

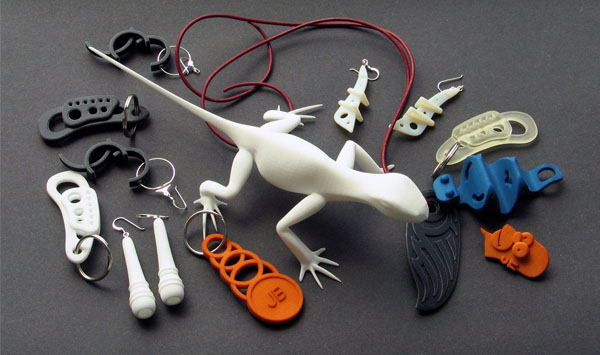
Dollyfied: Digital fabrication based business models can easily be cloned
Thoughts on the appearance of a copy of the CrayonCreatures service.
hi,
I’ve been working with digital fabrication for a while now,
enjoying the hype cycle of 3D Printing and exploring new scenarios of creation, production and consumption.
In the past week I had some of hiccups on my projects that I’d like to share,
the first one, came from a twit alerting of a copy of CrayonCreatures.com, a service to turn children’s drawings into figurines that I started 5 months ago as an experiment on personalized goods & on-demand production that turned into a successful worldwide service of customized 3D printed figurines.
The past months have been quite crazy, fulfilling orders, answering interview and sending pictures to press requests. The project was first covered at the Wired magazine just three days after it was launched and it then appeared in various TVs, radio programs, international printed magazines and online publications from the tech-world to the mom-networks. In April, crayonCreatures was flying all over the world when it was published under “innovation” at the KLM’s in-flight magazine. All very nice. Thanks.
I’ve sent figurines to all five continents and orders keep coming, specially from USA and Japan.
During these months, I had requests for licensing, franchising and affiliation in Latvia, South Africa, UK, Korea and China.
CrayonCreatures is still a one-man operation,
it is a nice adventure that I like to run, specially when I get e-mails from satisfied customers and people just saying “hello, I love what you do“. Thanks again.
So, when I got a twit alerting me of a “copy of crayon creatures“.
I checked it out, and it was more of a clone than a copy or evolution.

Fair enough, the tools are out there for everyone to use,
but I’m disappointed to see smart people taking the easy route and copy what already exists, without bringing it a step forward.
By taking, I mean, using the same words that came to my mind the day I put the website together and wrote something quick to describe the service.
English is not my mother tongue, and I’m sure that there might be many better ways to say:
“Kids produce an immense amount of drawings that populate fridges, living rooms and workspaces. Now you can turn them into real figurines“.
How is that possible?
Someone starting a business of something that already exists and describing it with the same worlds…. Didn’t anyone googled it?
From that point on, strange coincidences pile up;
Fonts on the website are very similar to the ones on the v.1.0 of CrayonCratures.com,
Some photos have the same look and feel,
…

Here is the thing:
Digital fabrication lowers the entry barriers to the world of making things to a point that anyone can start producing and delivering a goods service in a matter of weeks. And this is GREAT.
I don’t mind people doing similar things as me.
It would be like having a fruit shop and being annoyed by others selling fruits.
What I don’t understand is people deciding to focus their efforts into the new and fantastic world of digital fabrication and doing what already exists out there.
Right now I have a feeling,
and I’m building up an opinion.
I’m in favor for all the OpenWhatever (OpenHardware, OpenDesign, OpenSource, OpenGovernment….),
That’s why I didn’t registered or legally protected the idea behind CrayonCreatures.com
Because being open, you bring to others the opportunity to build upon what you do,
but (naively enough) I didn’t contemplated the possibility of someone taking literally what I did and stamping a new name on it, and this really hurts.
Seriously,
Is there a formula to stimulate innovation without the downsides of restrictive protection?
I know, it is called CC (creative commons), but what about business models?
How to dissuade blatant copies while encouraging inspiration?
</rant>
I have some ideas to help me feel better though:
- Get serious about it and officially ask them to stop. (not my style)
- 3D Print a tiny horse head and send it to them. (godfather style)
- ignore it, and keep delivering a great product and service as I’ve been doing since started.
Plus, as a geographical fact, being in Barcelona, I’ll always be at least one day ahead of any copycat from America
Thanks for reading.


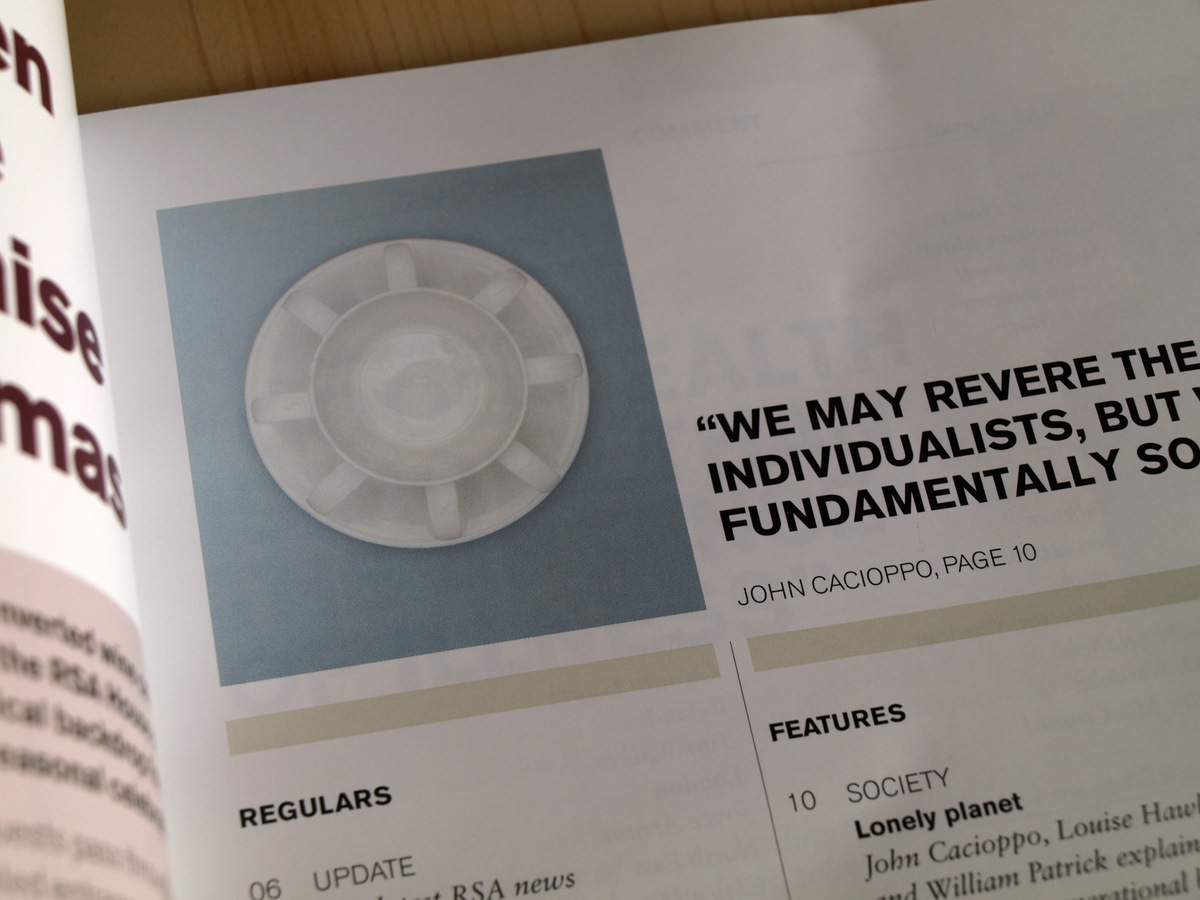
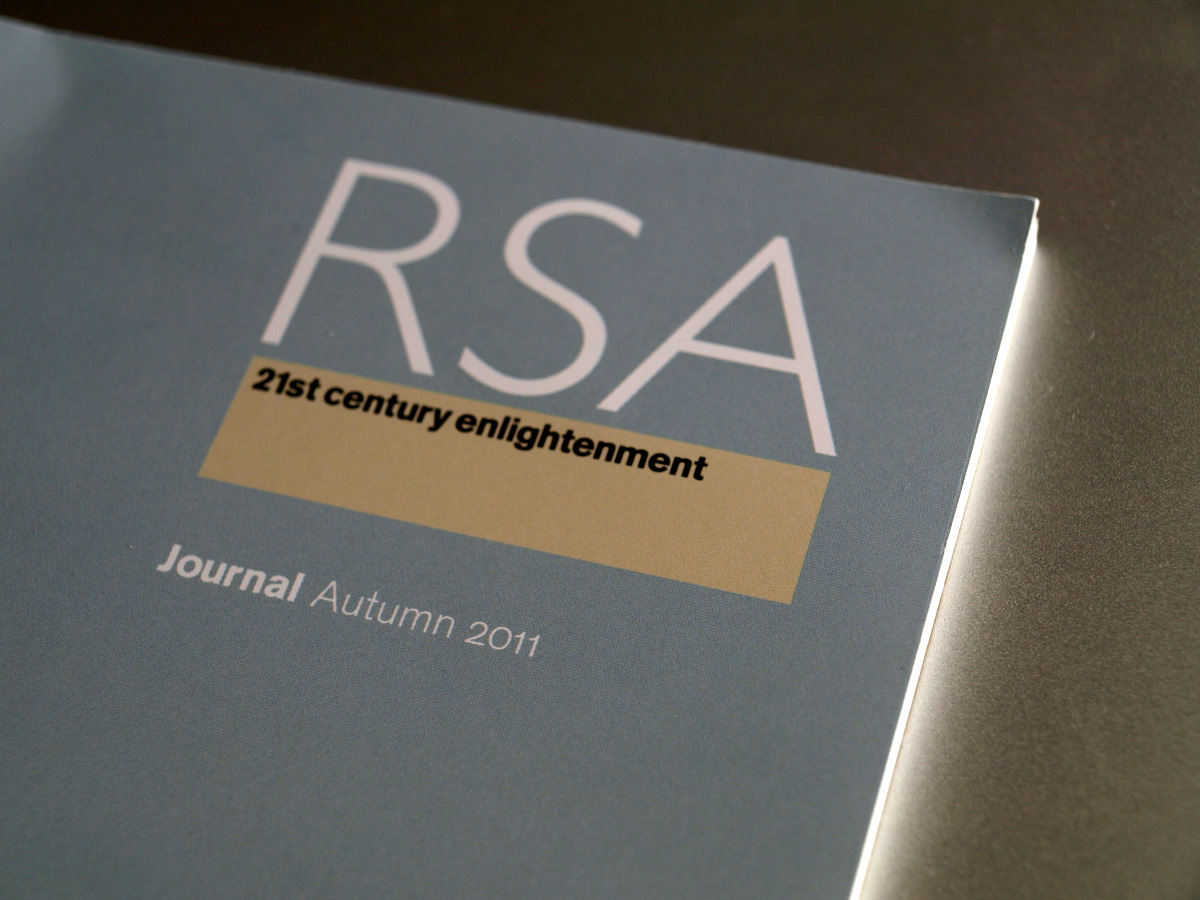
RSA | collaboration
We are very happy to have collaborated with the RSA (Royal Society for the encouragement of Arts, Manufactures and Commerce)

We are very happy to have collaborated with the RSA (Royal Society for the encouragement of Arts, Manufactures and Commerce)
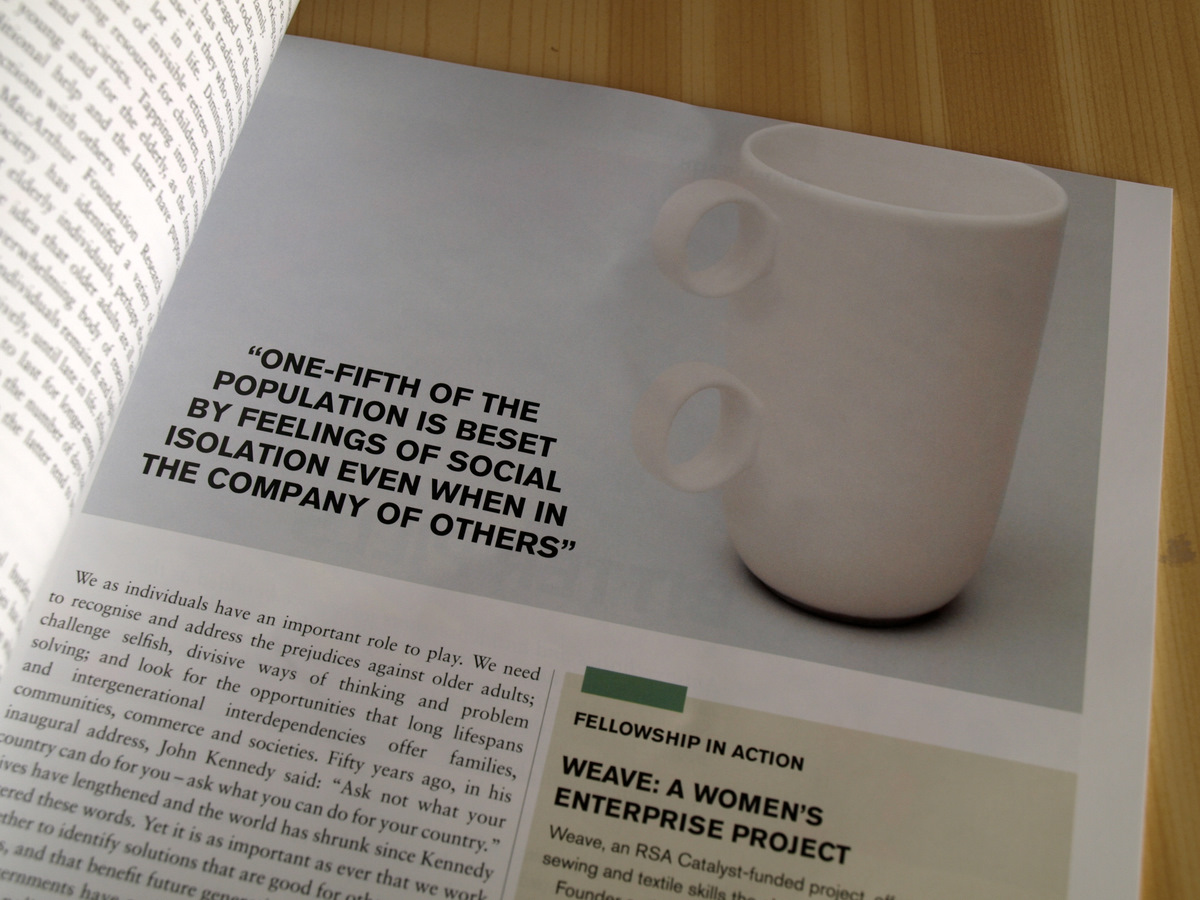
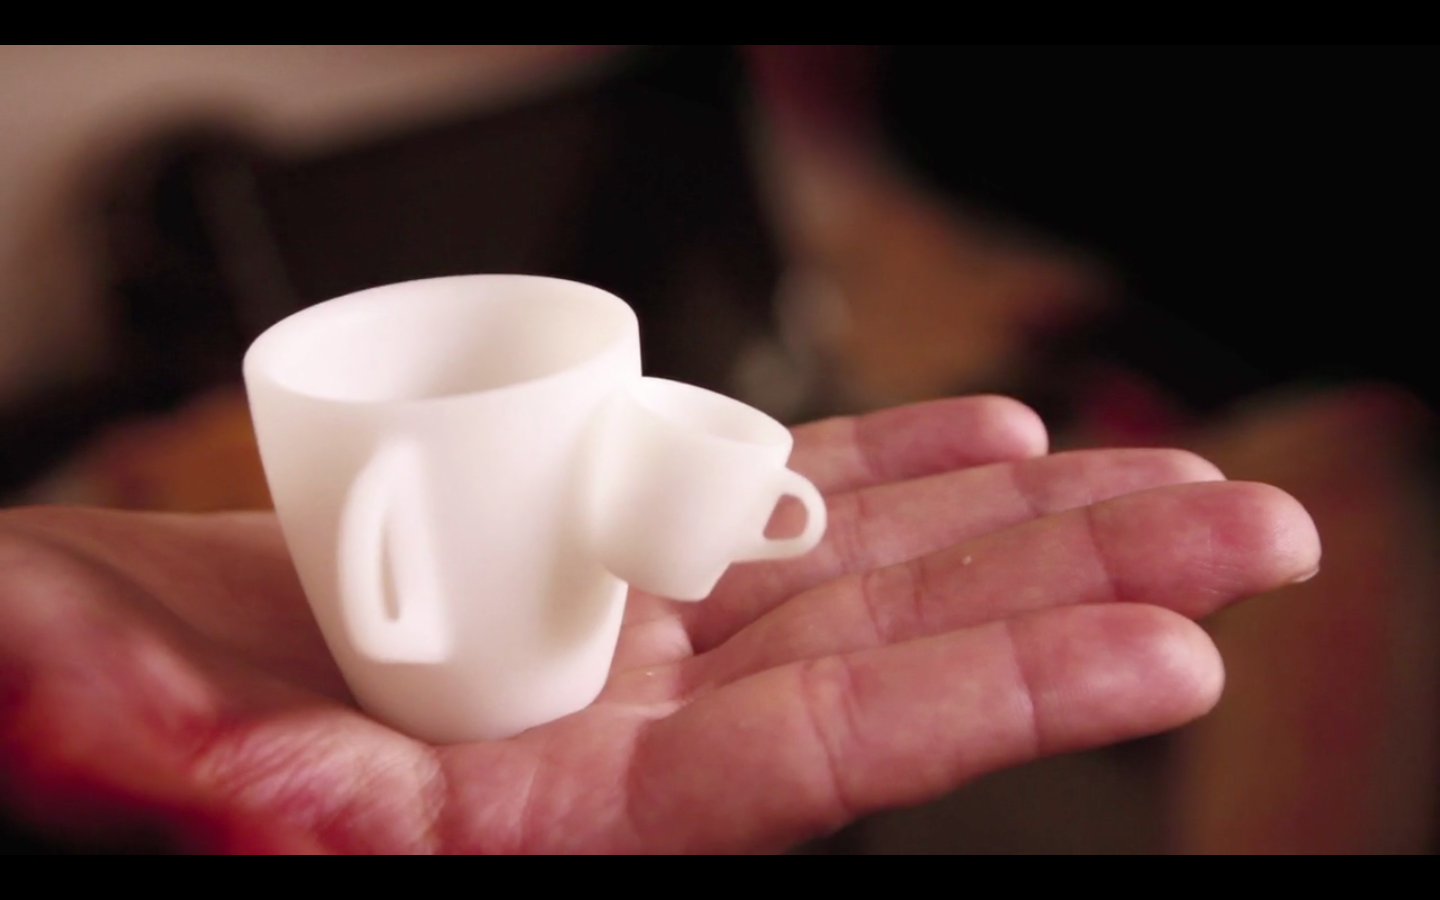
The OctoCup and the Double-Espresso-Cup appeared in the 2011 Autumn Issue of the RSA Journal, illustrating a fantastic article by John Cacioppo.
Lonely Planet: The combination of rising life expectations and declining social capital means that more people experience isolation than ever before. What can we do to restore a sense of connection between individuals and generations?


Read the text-only article here.
Download the RSA Journal Autumn 2011 [PDF 4 Mb]
Subscribe to the RSA Journal
View the current issue.

3D Printing and the Culture of Creativity / video
Happy to appear at this nice video featuring the 3D Printing technology and people behind their service.
Produced by Shapeways.
Shapeways produceced a nice video featuring the 3D Printing technology and people behind their service.


Stephan Malik, the film director, and Carine Carmy, shapeway’s Marketing Director came all the way to Barcelona to shoot some footage and have a chat on 3D-Printing and what it means for designers.
Read more at shapeways.com

DigitalForming | beta testing
Invited to a co-Design workshop at iMaterialize headquarters, to test and play with DigitalForming‘s software.
Cunicode was invited to a co-Design workshop at iMaterialize headquarters, to test and play with DigitalForming‘s software.

Lisa Harouni, DigitalForming’s CEO, introduced the software tools & services.

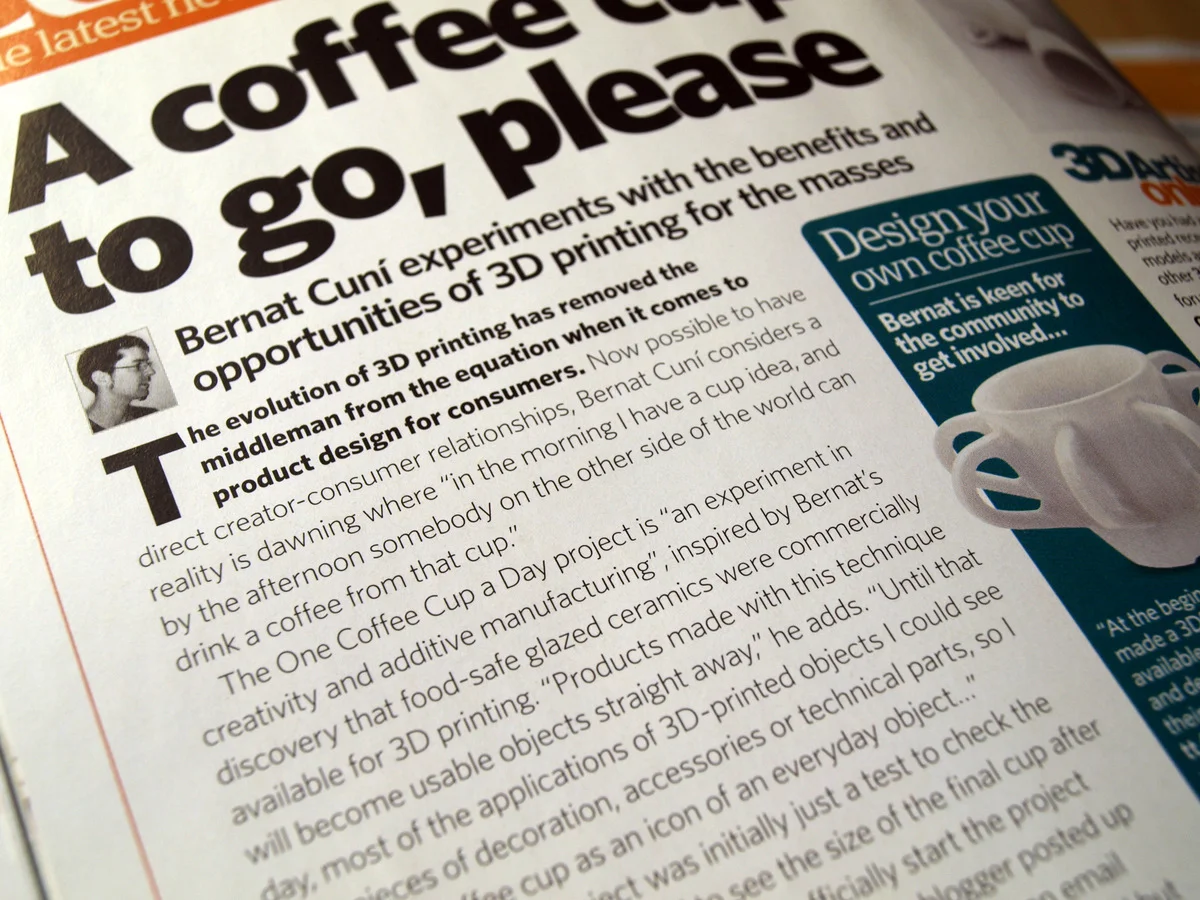
Wired Magazine
This mont’s Wired Magazine comes with a nice cover story about 3D Printing,
And three of the coffee cups are displayed as an example of design for 3D Printing, in ceramics.
This mont’s Wired Magazine comes with a nice cover story about 3D Printing,
And three of the coffee cups are displayed as an example of design for 3D Printing, in ceramics.
You might think of 3-D printing as bleeding-edge technology, relevant only to geeks or high-end design workshops. But you may have encountered a 3-D printer already, in circumstances so prosaic you didn’t even notice.
Let’s start at the dentist’s office. Many custom dental fittings are now 3-D printed—like the series of mouth guards, each slightly different from the last, that are used to change tooth alignment over months. After a dental technician scans the current position of the teeth, all positions intermediate to the desired end point are modeled by software and then printed out in plastic. Also, if you’re lucky enough to have a dentist who can replace a crown in a single sitting, it’s because models are 3-D printed and then the replacement teeth are milled right there in the office.
And that’s just the tooth business. Practically every consumer item or electronic gadget you own has been prototyped on a 3-D printer; ditto for the newer buildings around you. Today you can get a custom 3-D-printed action figure of your World of Warcraft character or your Xbox Live avatar. And if you go to Tokyo, you can have your head scanned for a photo-realistic action figure of yourself. (Try not to get too creeped out.)
Commercial 3-D printing works with only a few dozen types of materials, mostly metals and plastics, but more are in the works. Researchers are experimenting with exotic “inks” that range from wood pulp to sugar. Some devices can extrude liquid foods, like cupcake icing and melted chocolate. Soon we’ll be able to print electric circuits, potentially making complex electronics from scratch.”

The cups displayed are: The CupCake Cup, the Studded Belt Cup & the Double Espresso
The article, “The New MakerBot Replicator Might Just Change Your World” is written by Chris Anderson, Wired’s editor-in-chief, and an advocate of maker culture and openness:
Chris Anderson on “Desktop Manufacturing’s ‘Macintosh Moment’”
With the advent of affordable, advanced desktop 3-D printers like the Makerbot Replicator and Cubify’sCube, we’re standing at the starting line of a manufacturing revolution. These tools, once reserved for top-level firms, give curious minds everywhere rapid prototyping capabilities for almost any type of project. Online 3-D object storehouses like Shapeways and Thingiverse offer immediate access to an ever-growing collection of printable and manipulatable objects, removing supply chain limitations. And new, straightforward software like Autodesk’s 123D series and TinkerCAD are allowing people to invent 3-D printable creations formerly relegated to creude sketches on scratch paper.
One of the biggest questions about this revolution, though, is what ways we’ll see it develop and spread. Chris Anderson, Editor-in-Chief of Wired, DIY robotics enthusiast, and author of recently released Makers: The New Industrial Revolution, discusses that notion in this month’s cover story.
In an age of open source, custom-fabricated, DIY product design, all you need to conquer the world – and to profit – is a brilliant idea. Welcome to the next Industrial Revolution.

3D Print & Design Workshop | Barcelona
3D-Printer assembly & creative experimentation
Workshop | Barcelona | September 2012
by Elisava + Fundacio CIM
3D-Printer assembly & creative experimentation
Workshop | Barcelona | September 2012
by Elisava + Fundacio CIM
You’ll build your own 3DPrinter and develop a design project to be made with your machine.
Course is conducted jointly by the Fundació CIM (UPC) (Llorens Artigues 12, Barcelona) and ELISAVA School of Design and Engineering of Barcelona (La Rambla 30-32, Barcelona)
DURATION: from 12 to 21 September 2012. 60h PRICE: 2.400 € (Includes RepRap machine, the student makes it and brings it home)
LANGUAGE: Spanish / Catalan / English
SCHEDULE: from 10am to 2pm and from 3pm to 7pm
AIMED AT: Students with Degree qualifications in engineering or degree in design. Graduates in the fields of design, engineering, technology or production. Professionals with experience in the field of engineering or design. People self-taught in new production technologies
DIRECTION: Bernat Cuní (ELISAVA – Cunicode), Albert Fuster (Head of studies Degree in Design ELISAVA), Felip Fenollosa (Technical director Fundació CIM), Xavier Riudor (Head of Science and Technology Area ELISAVA), Arnau Díaz (academic management Fundació CIM), Albert Camps (Fundació CIM), Xavier Martínez (Fundació CIM). Lectures: Josef Prusa, Adrian Bowyer (RepRap Core Developer), Roger Uceda.
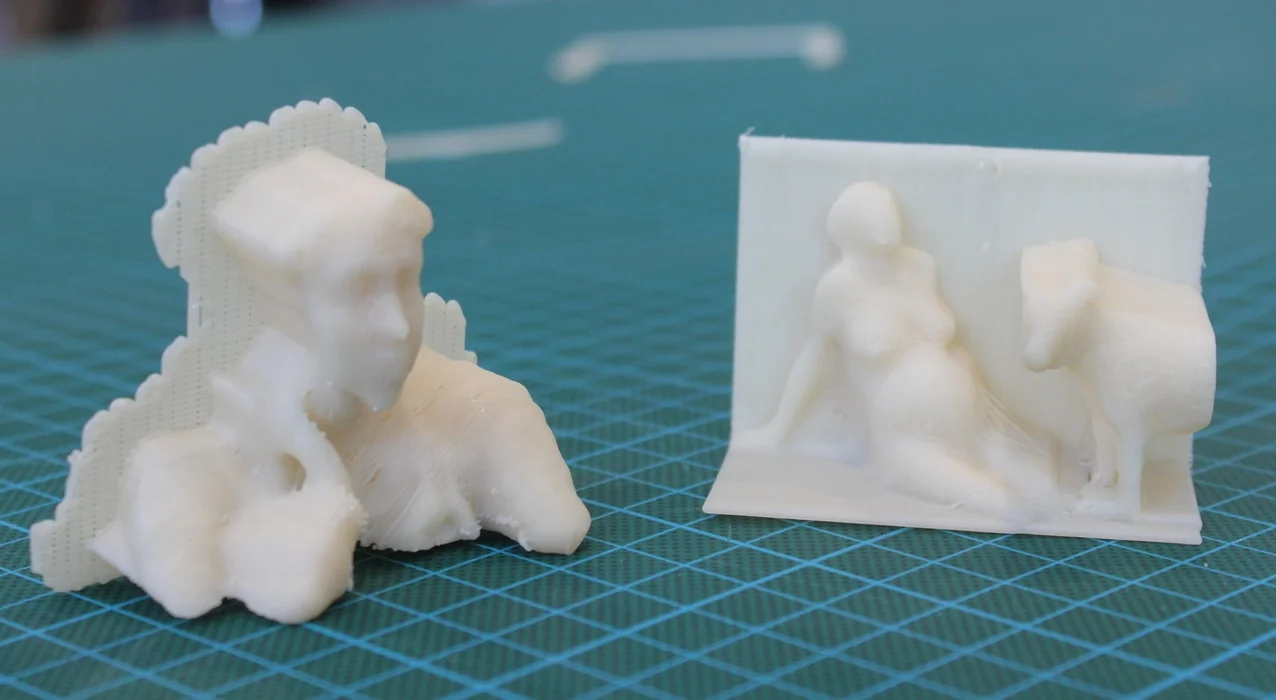
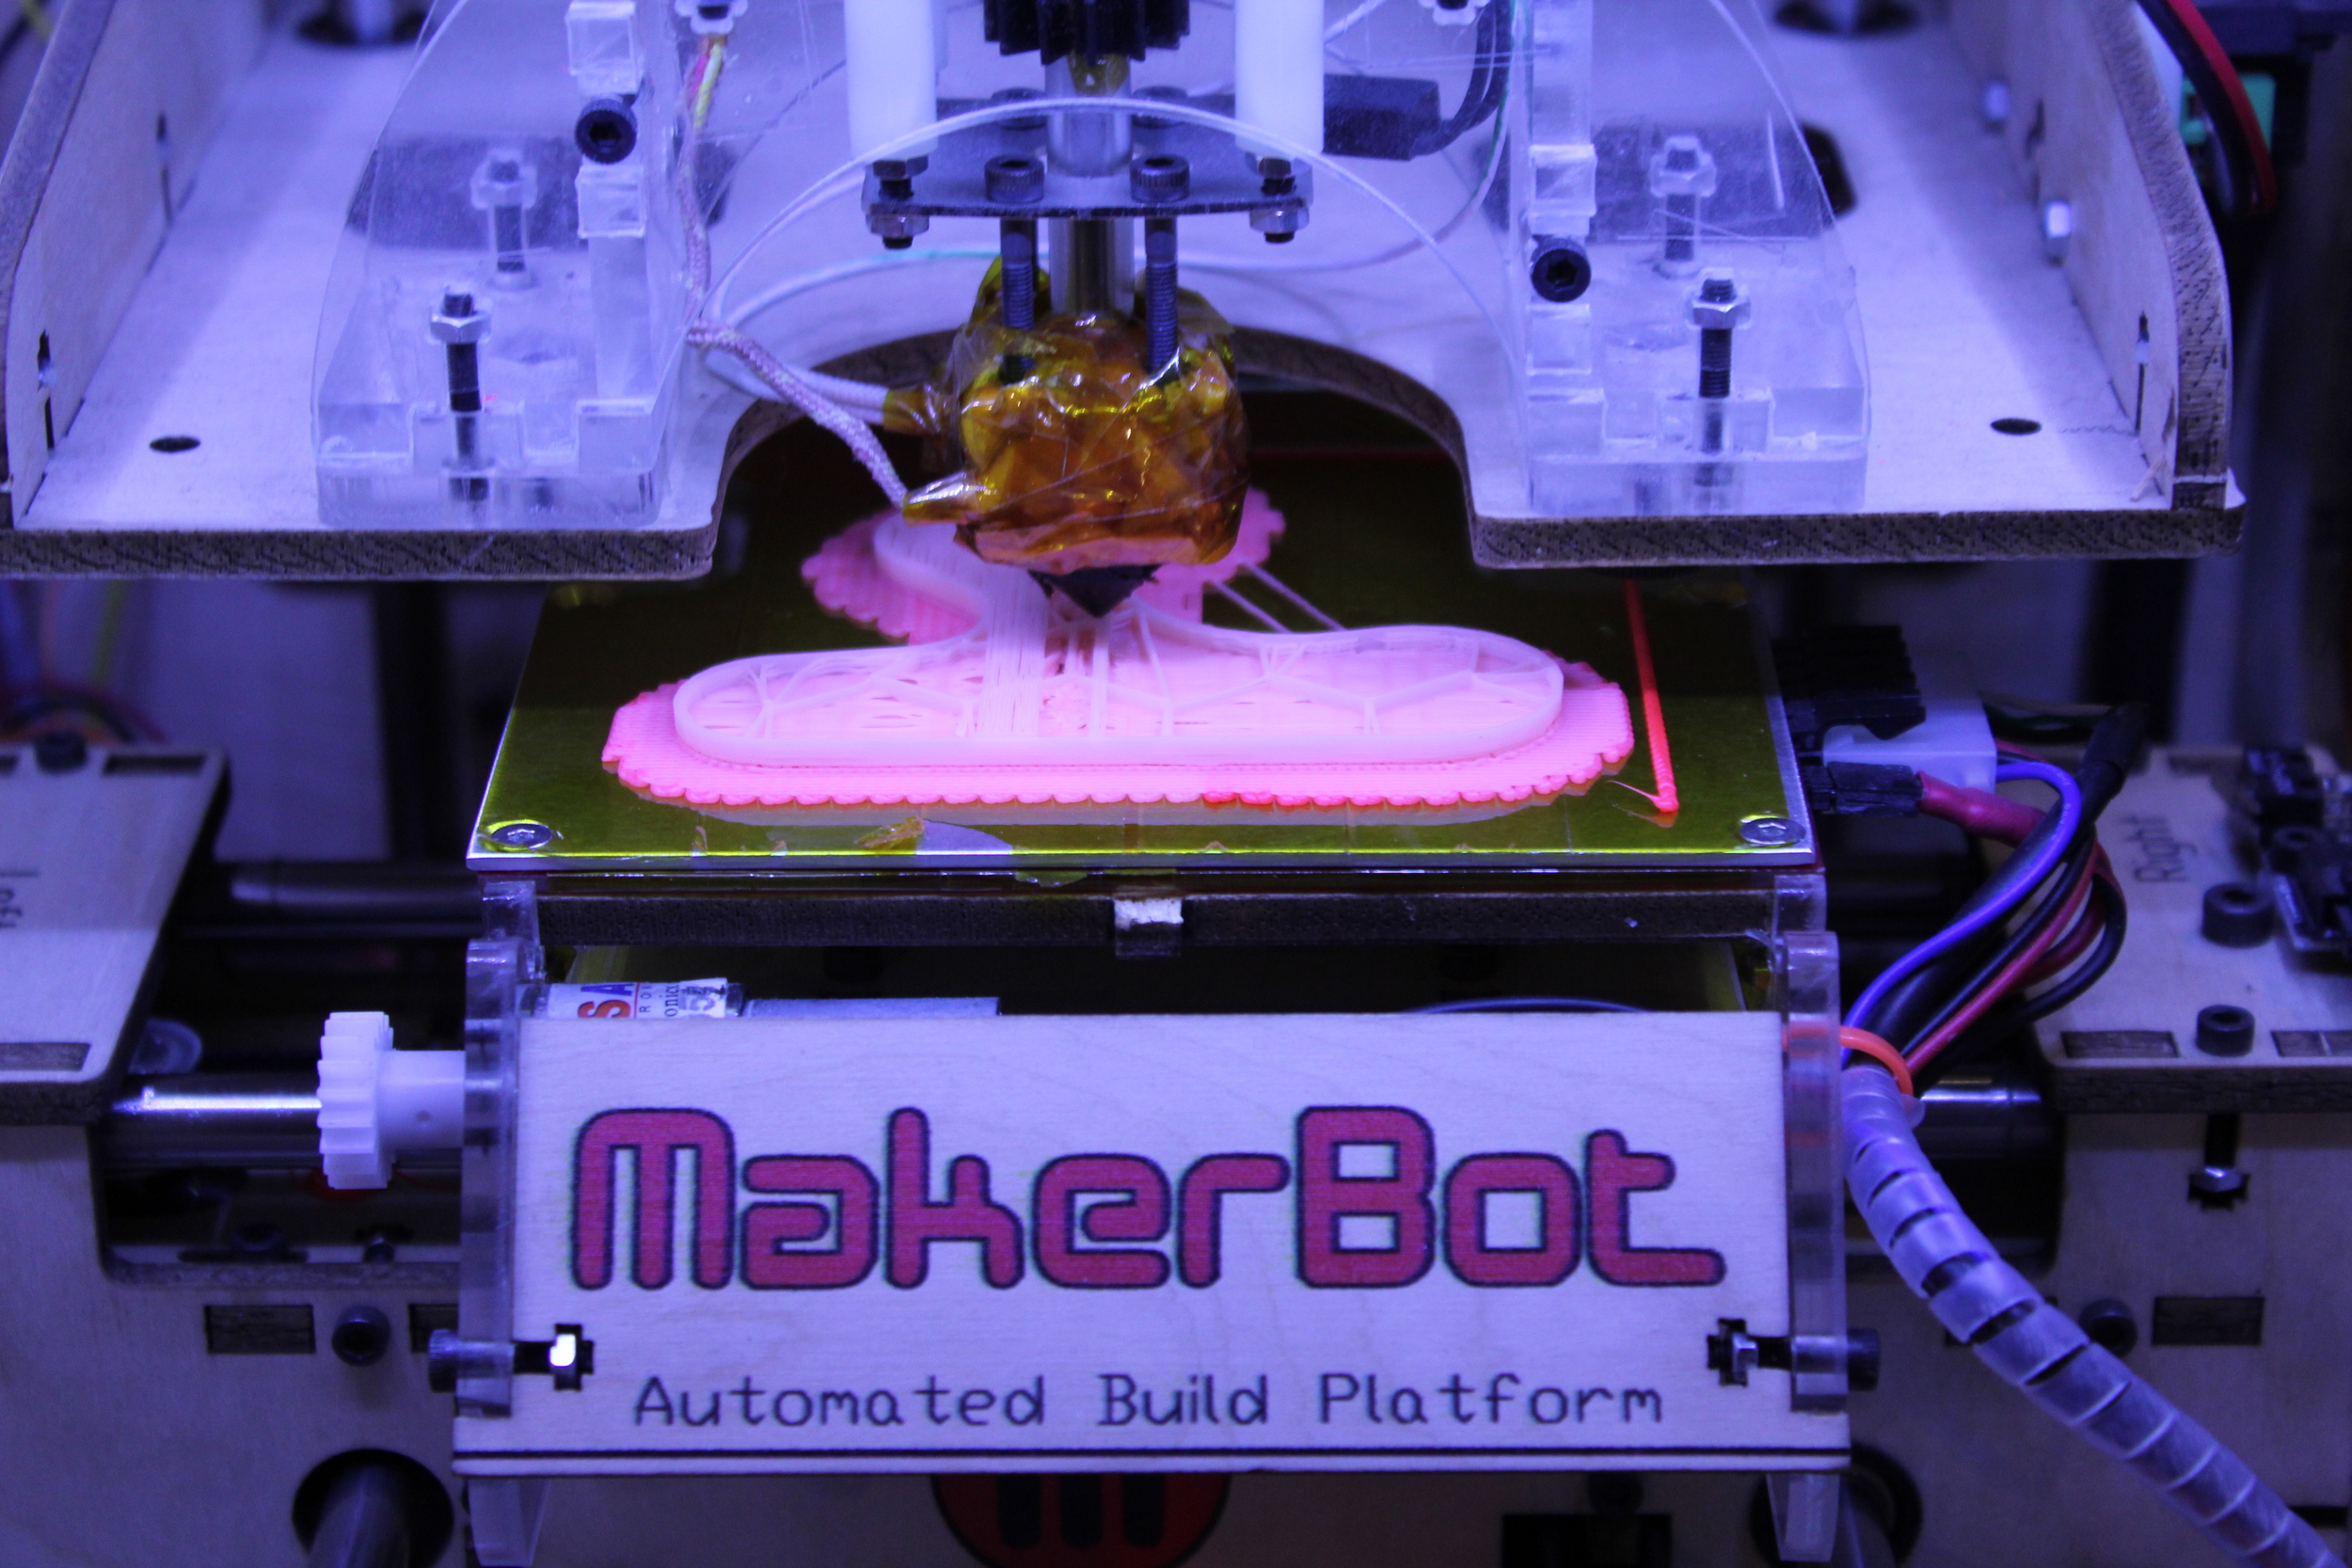
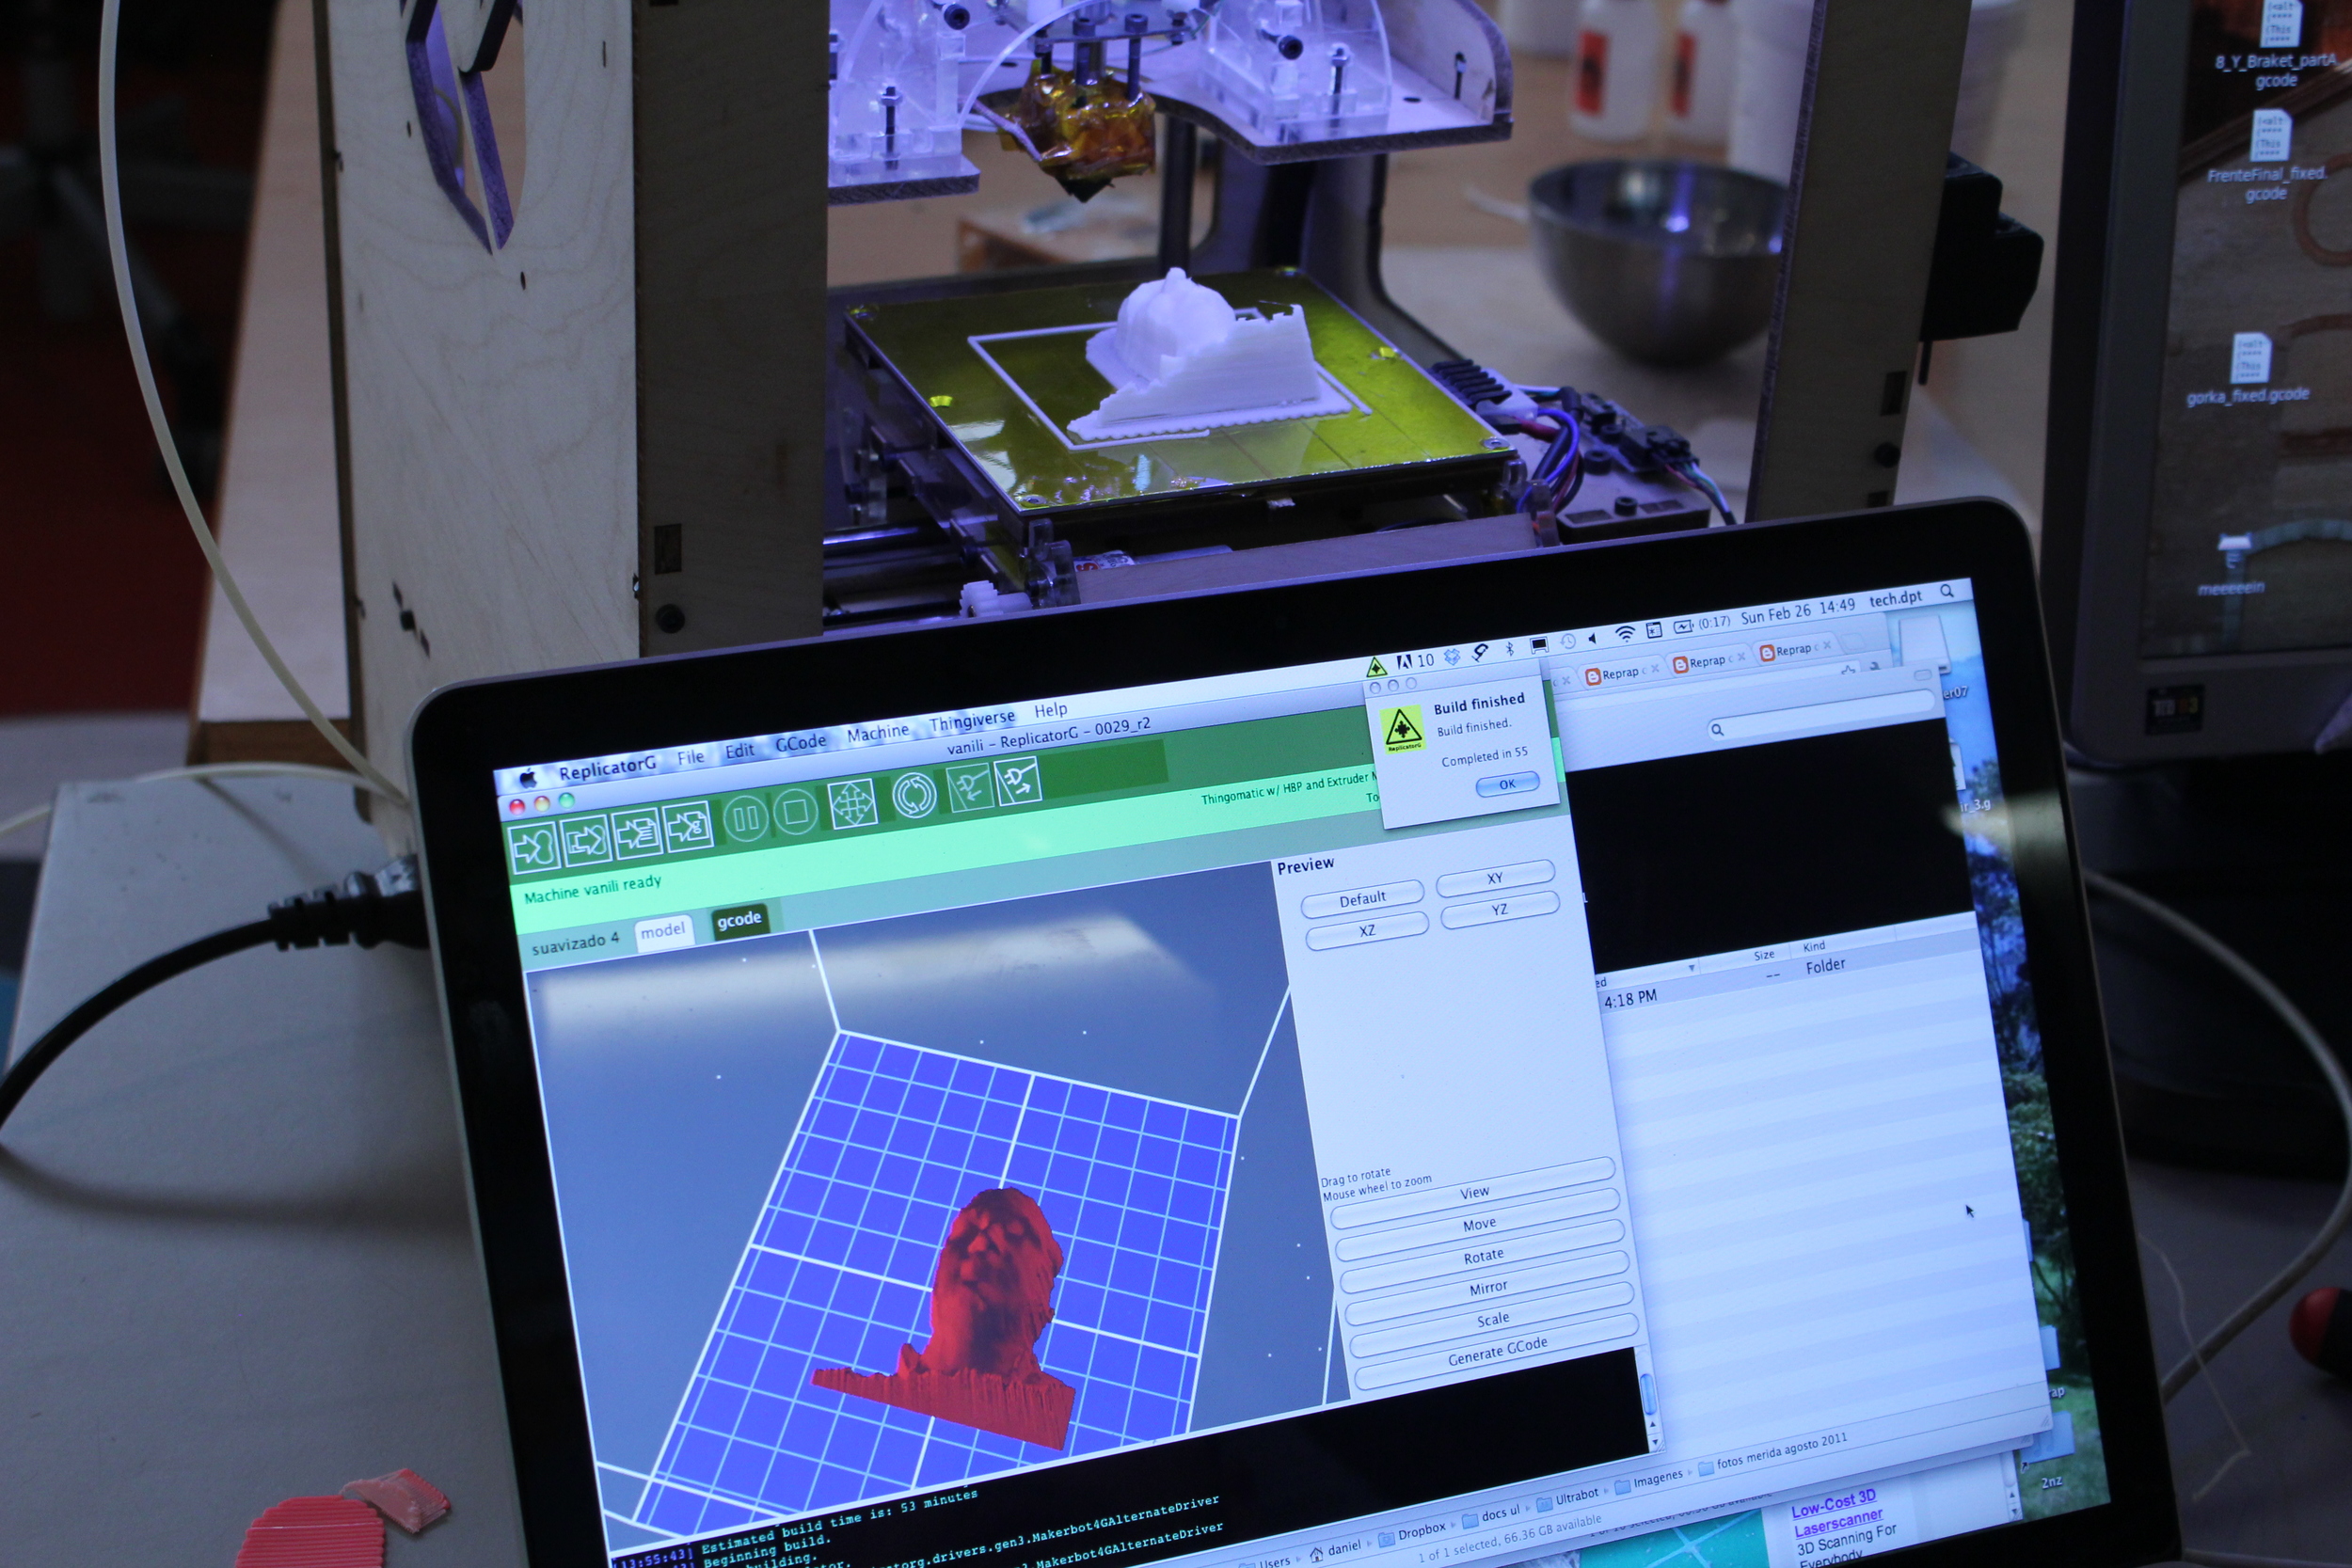
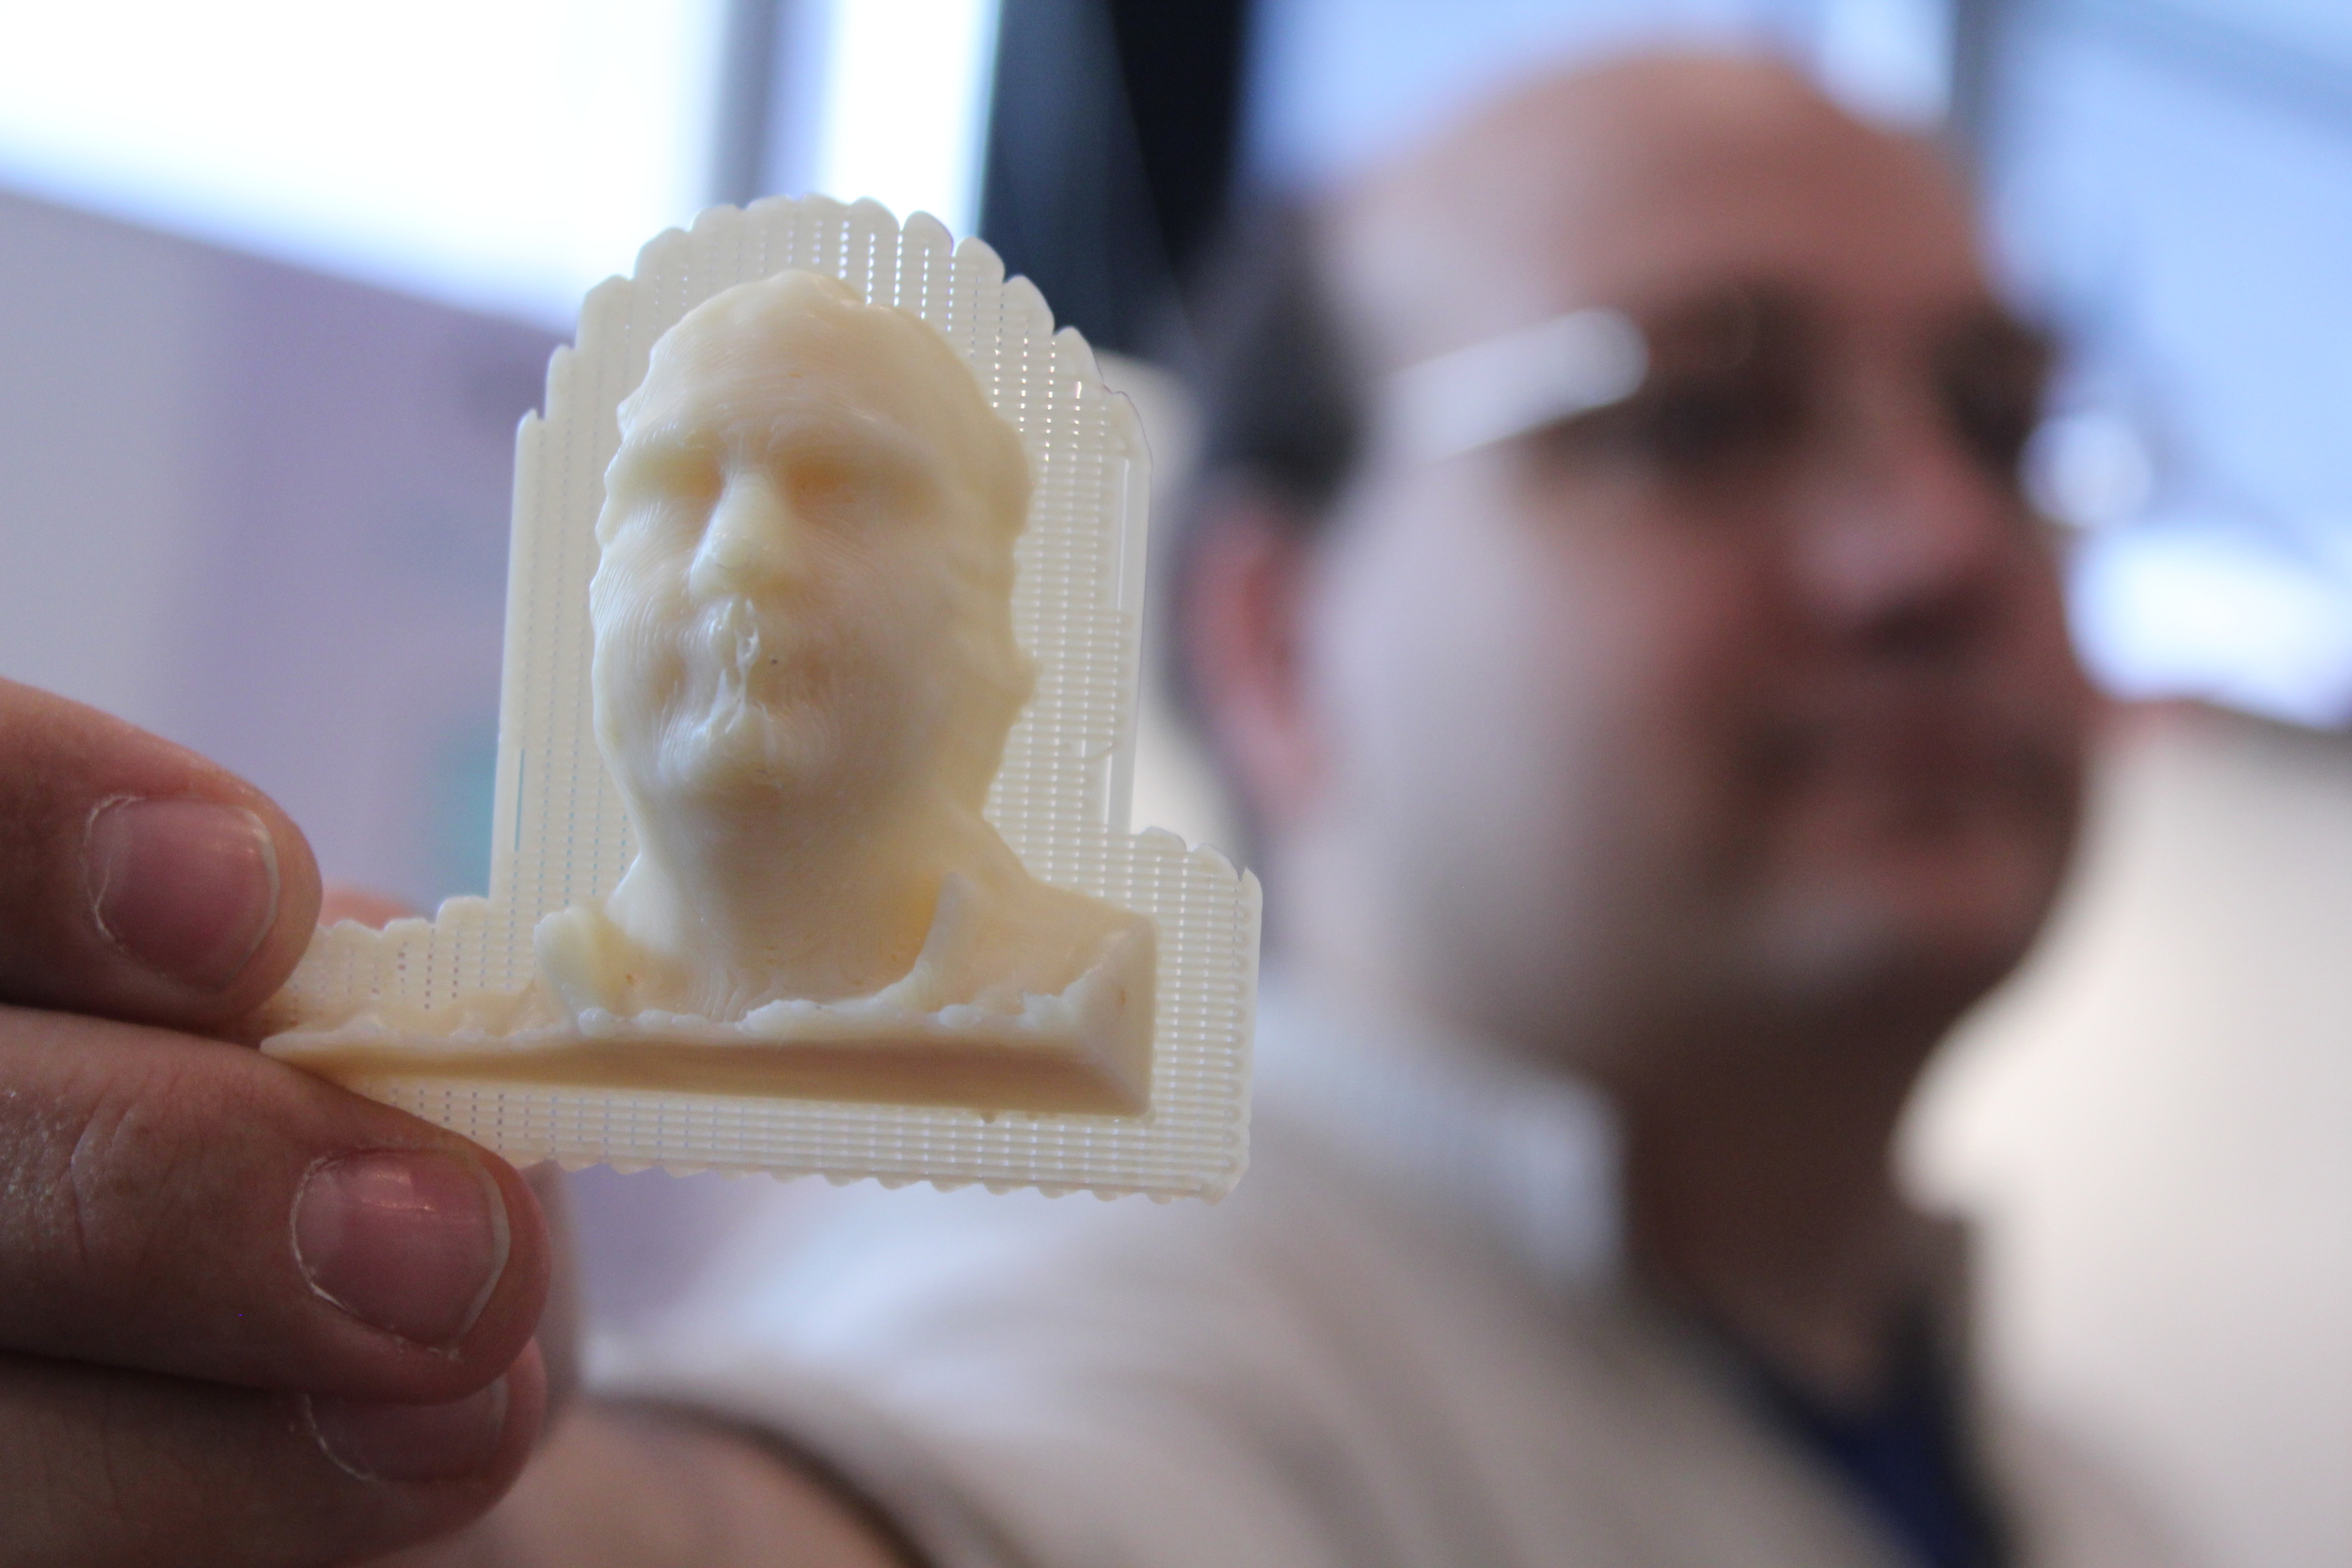
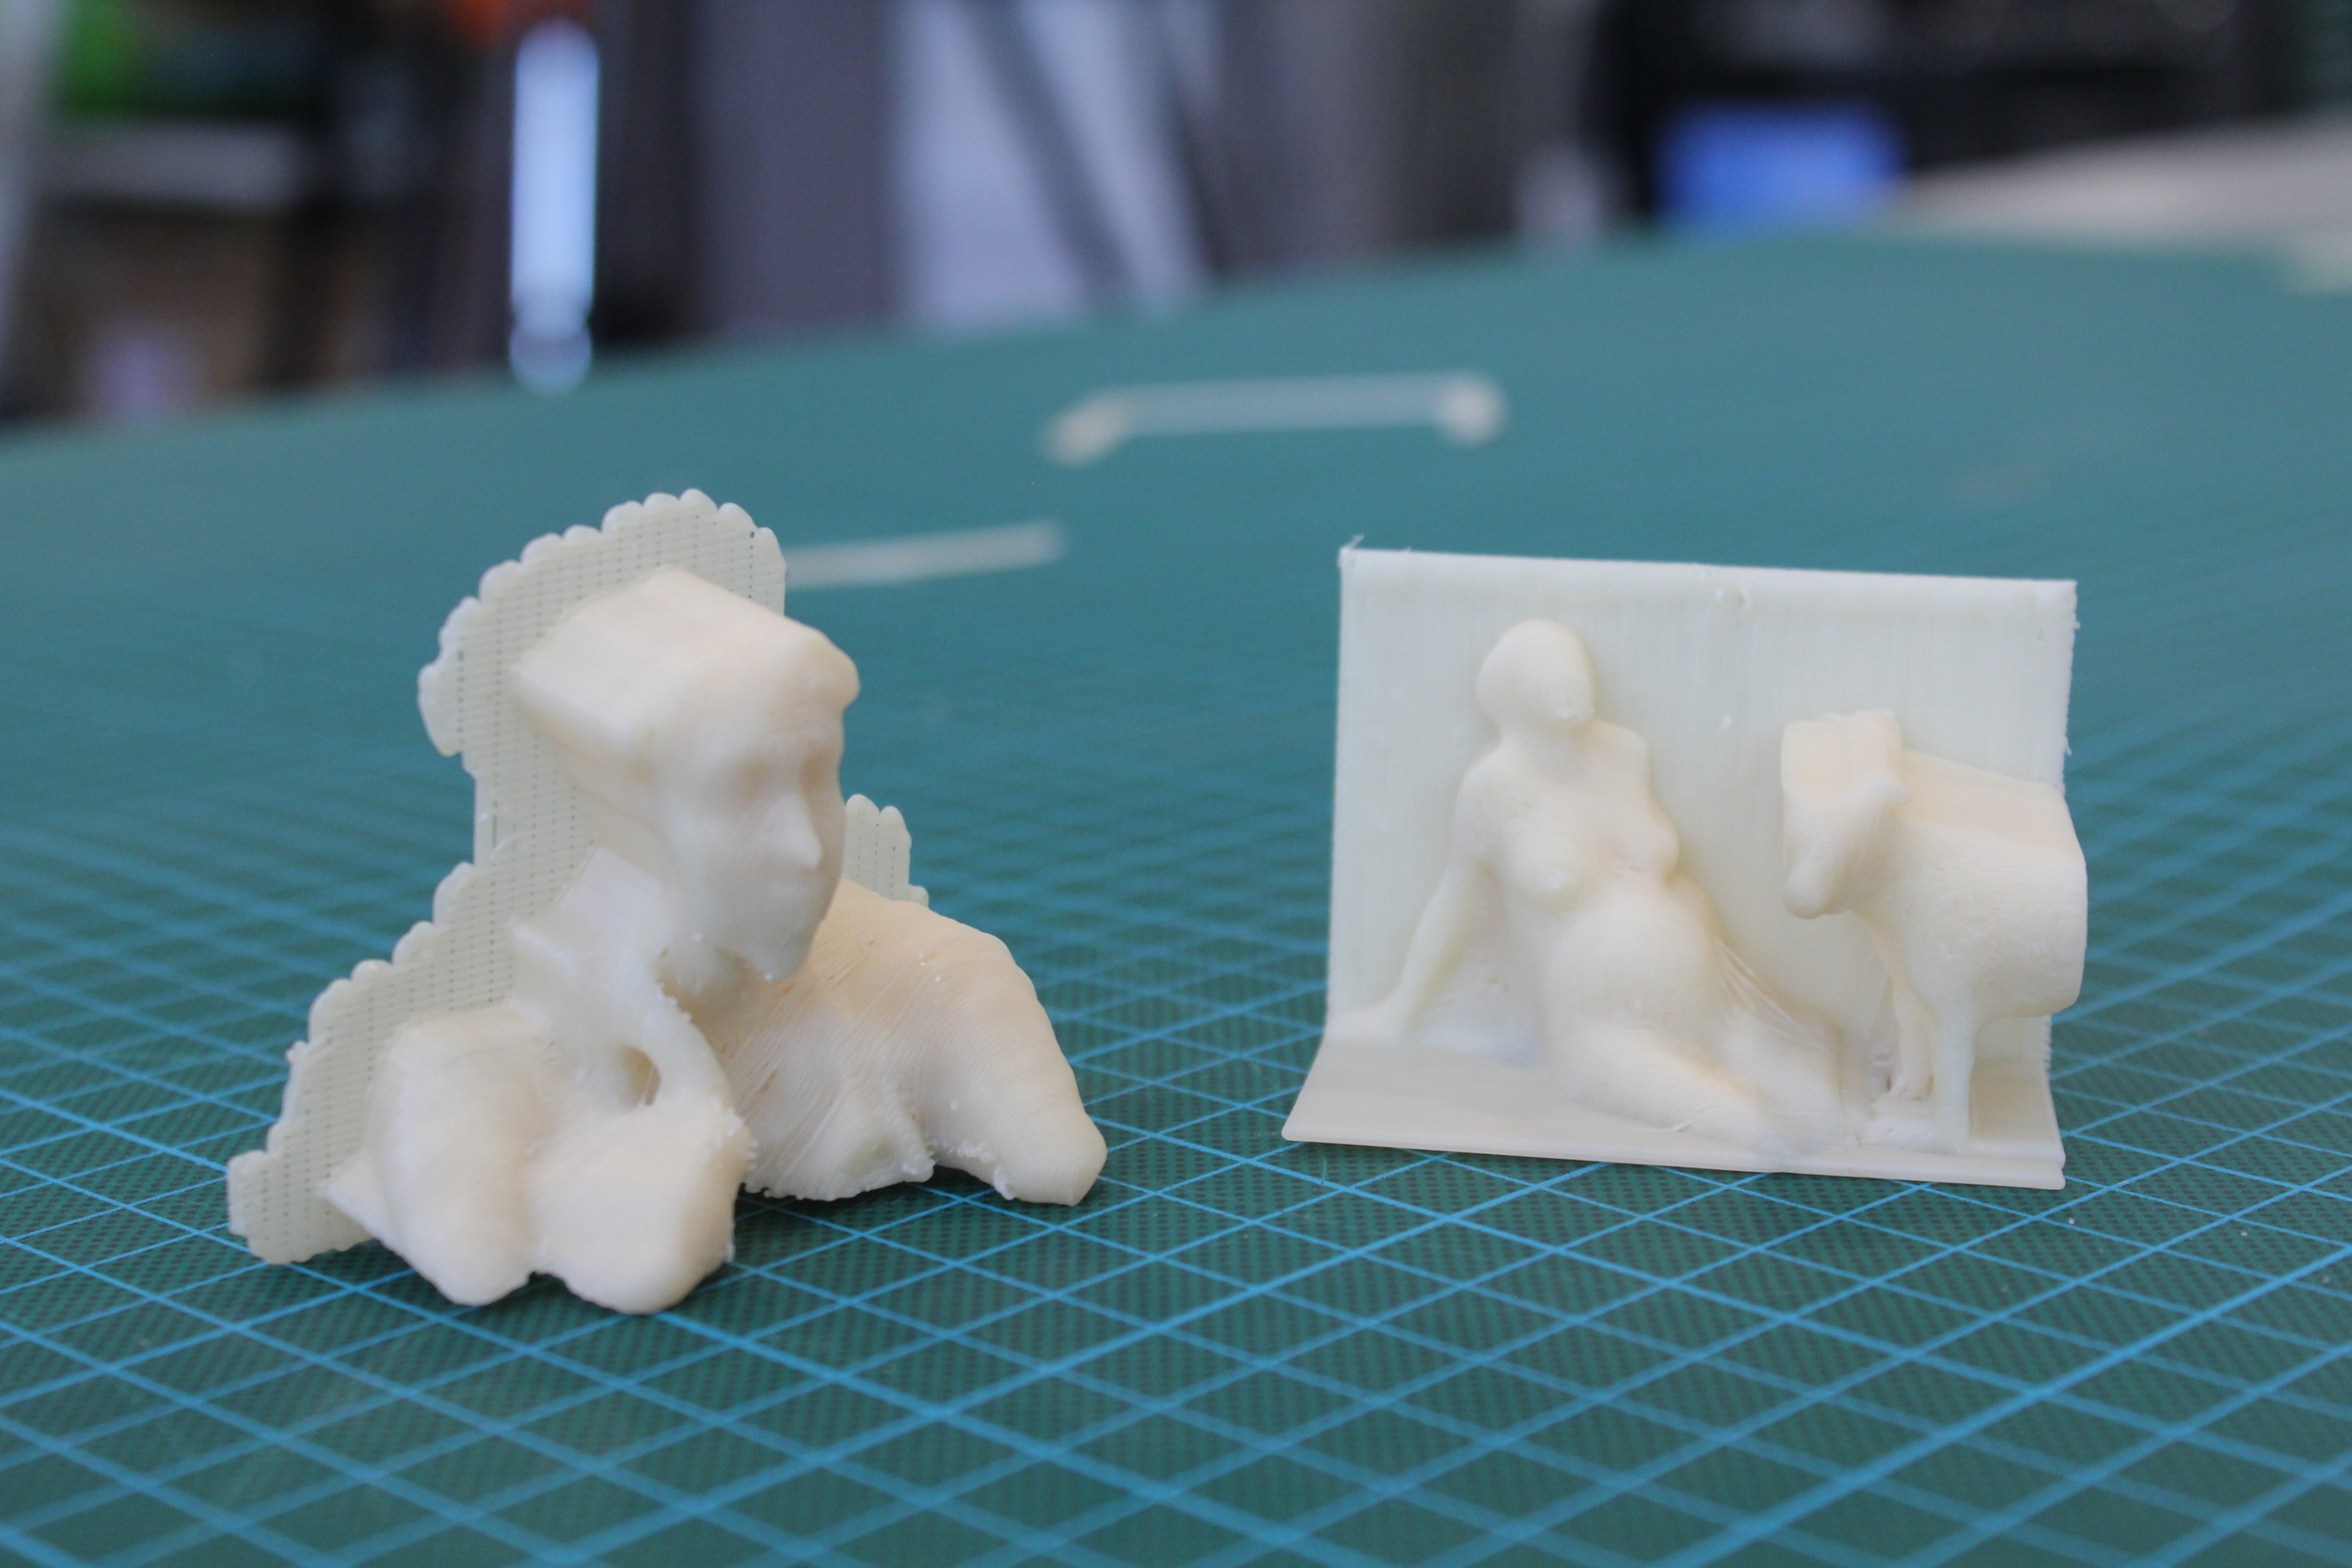
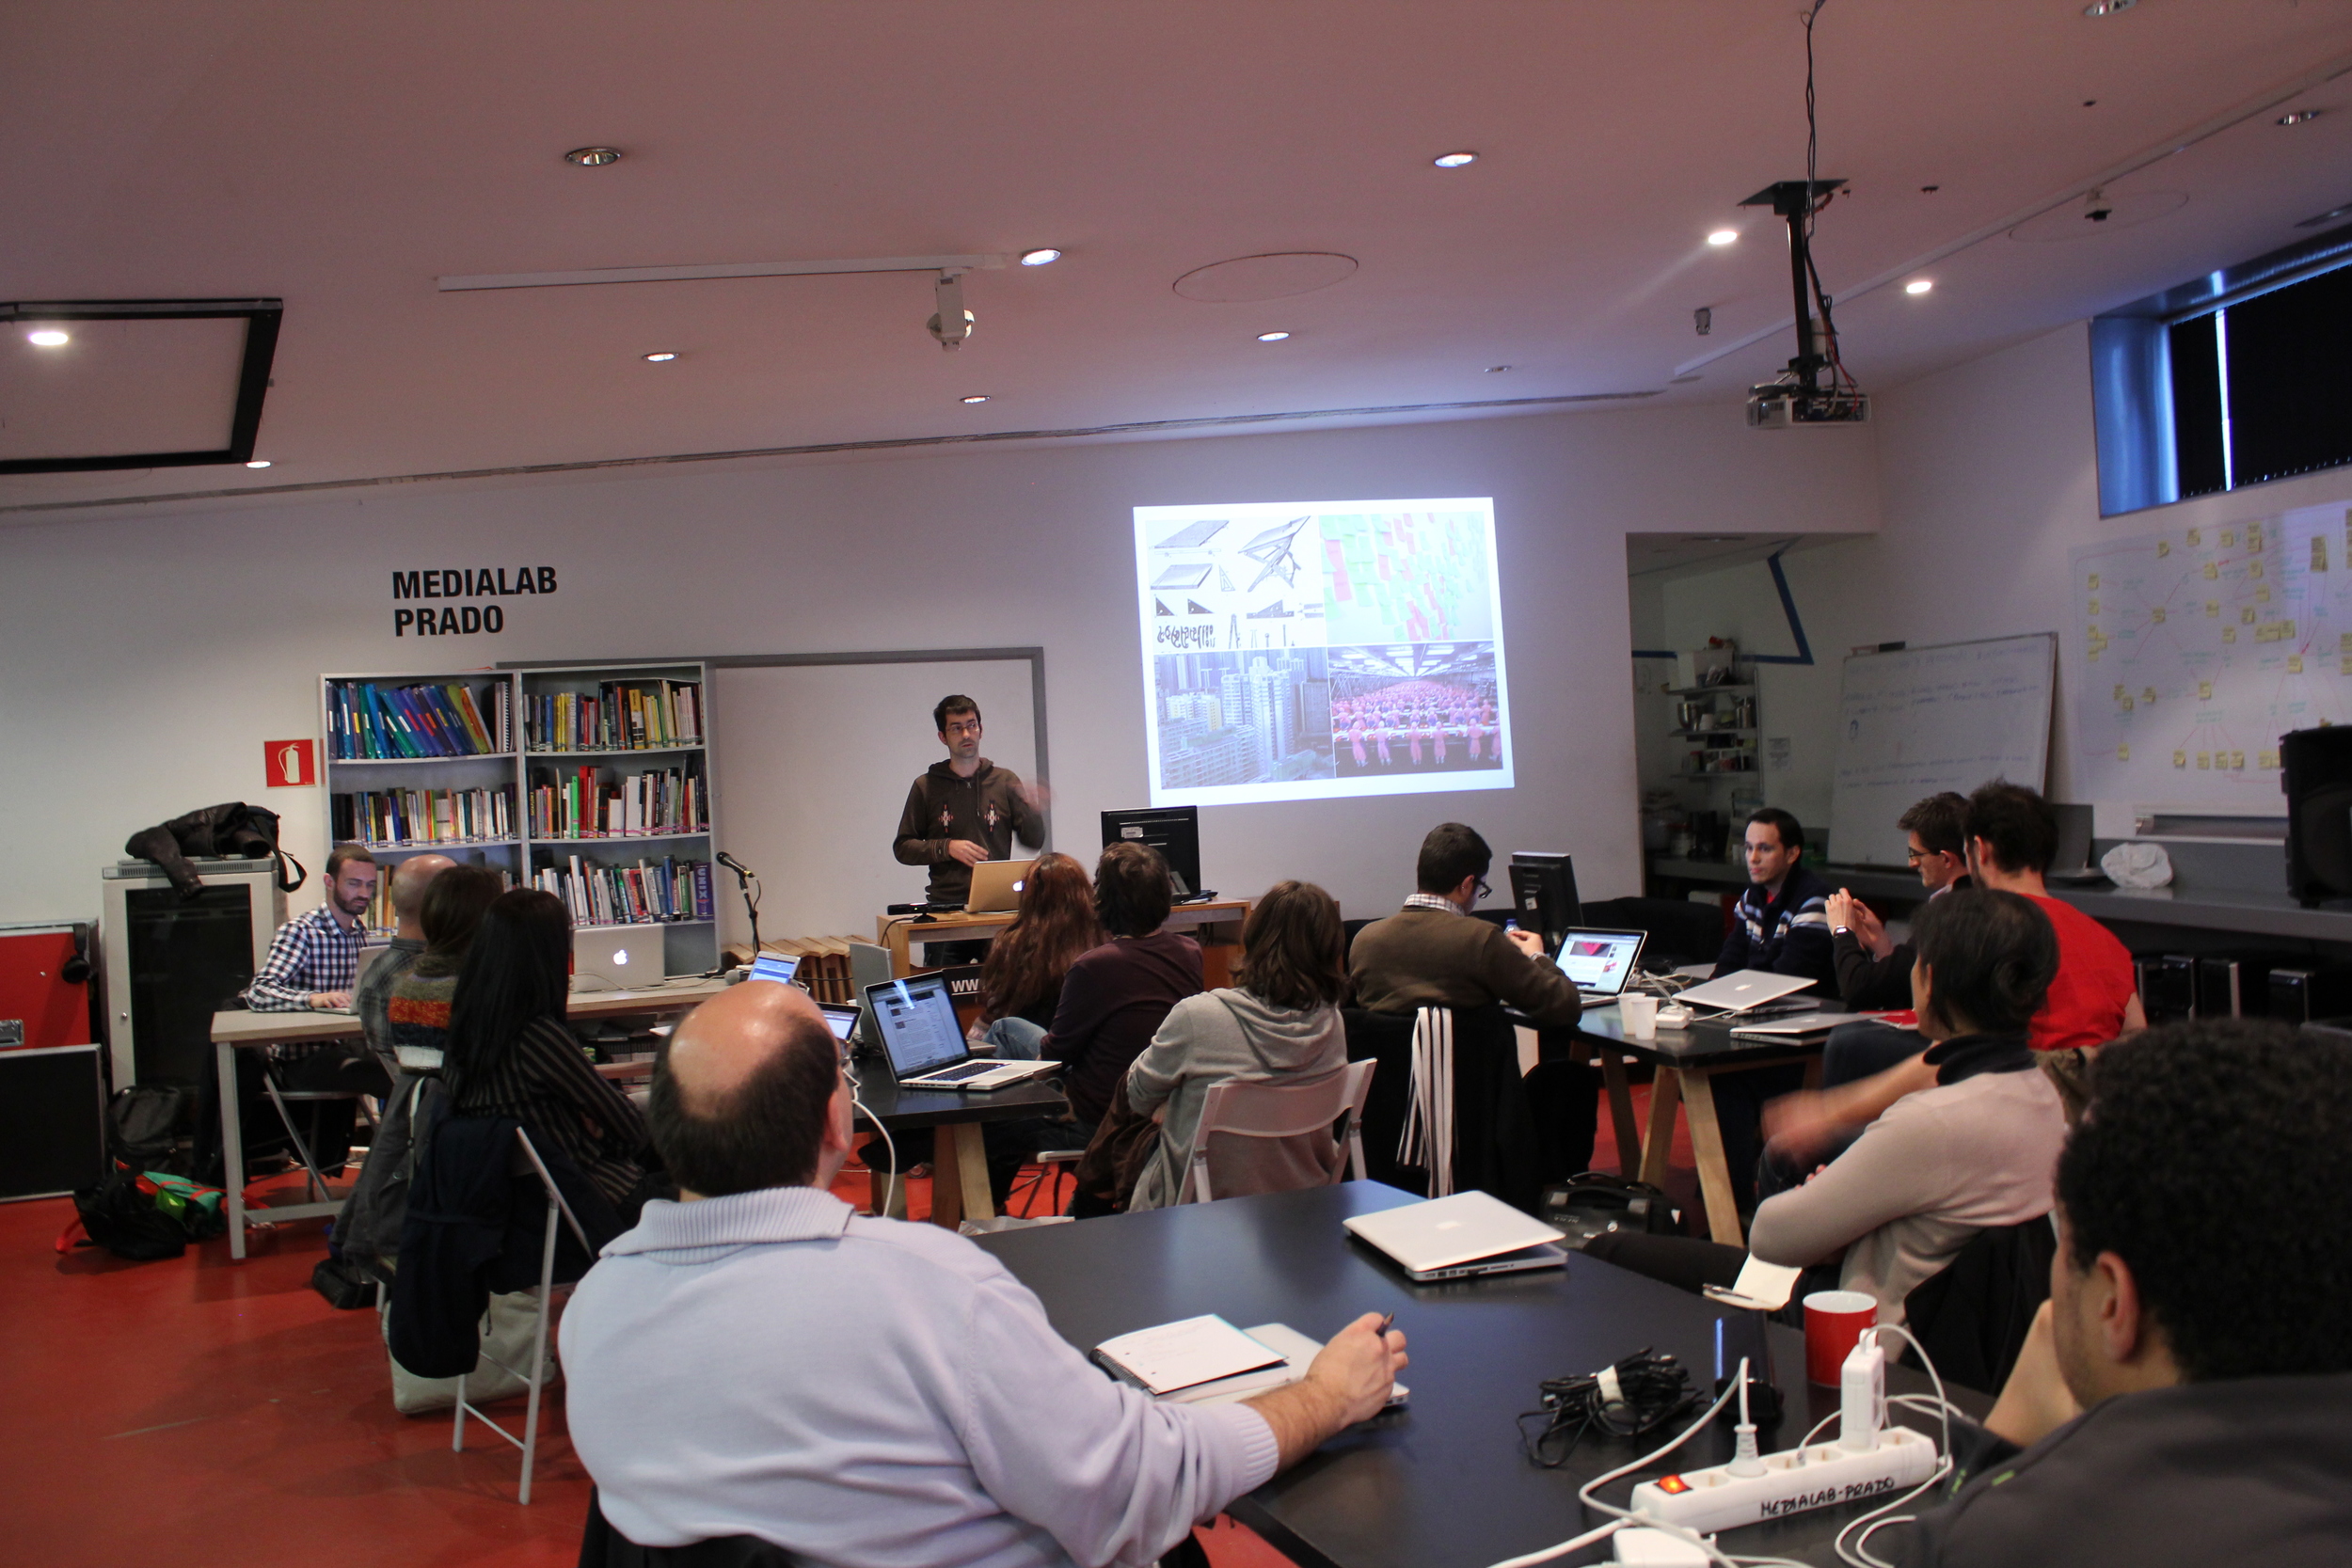
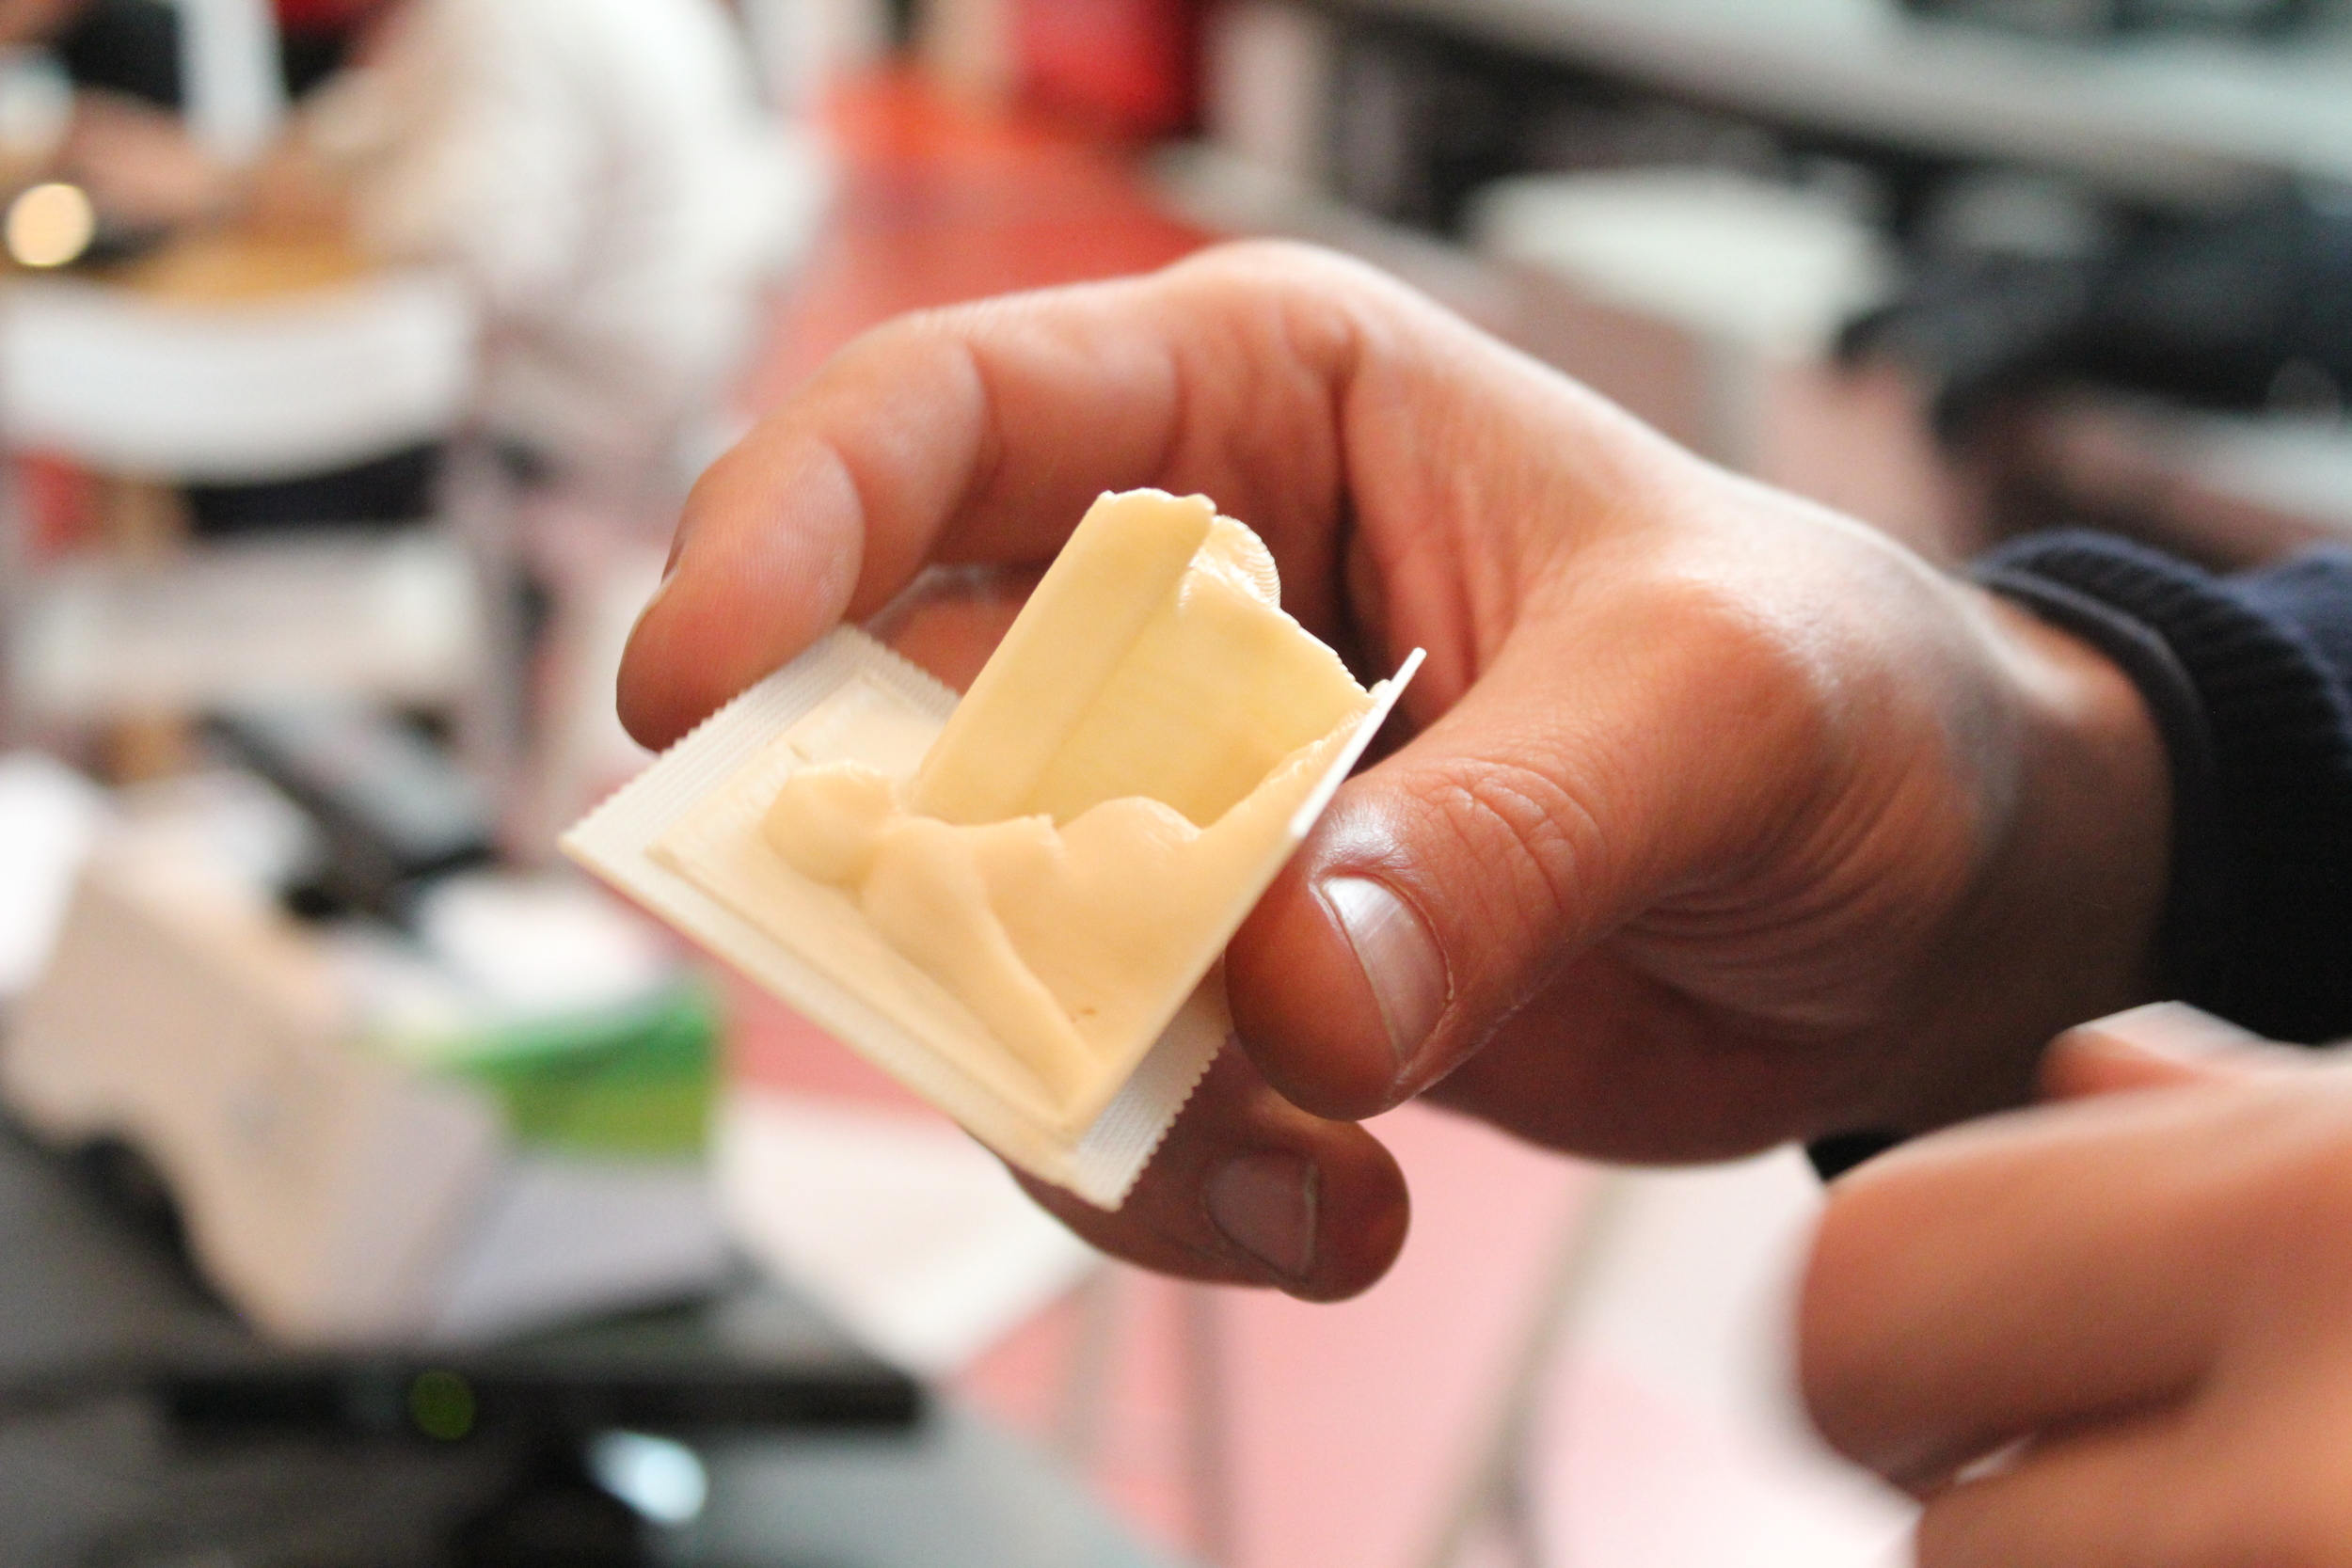
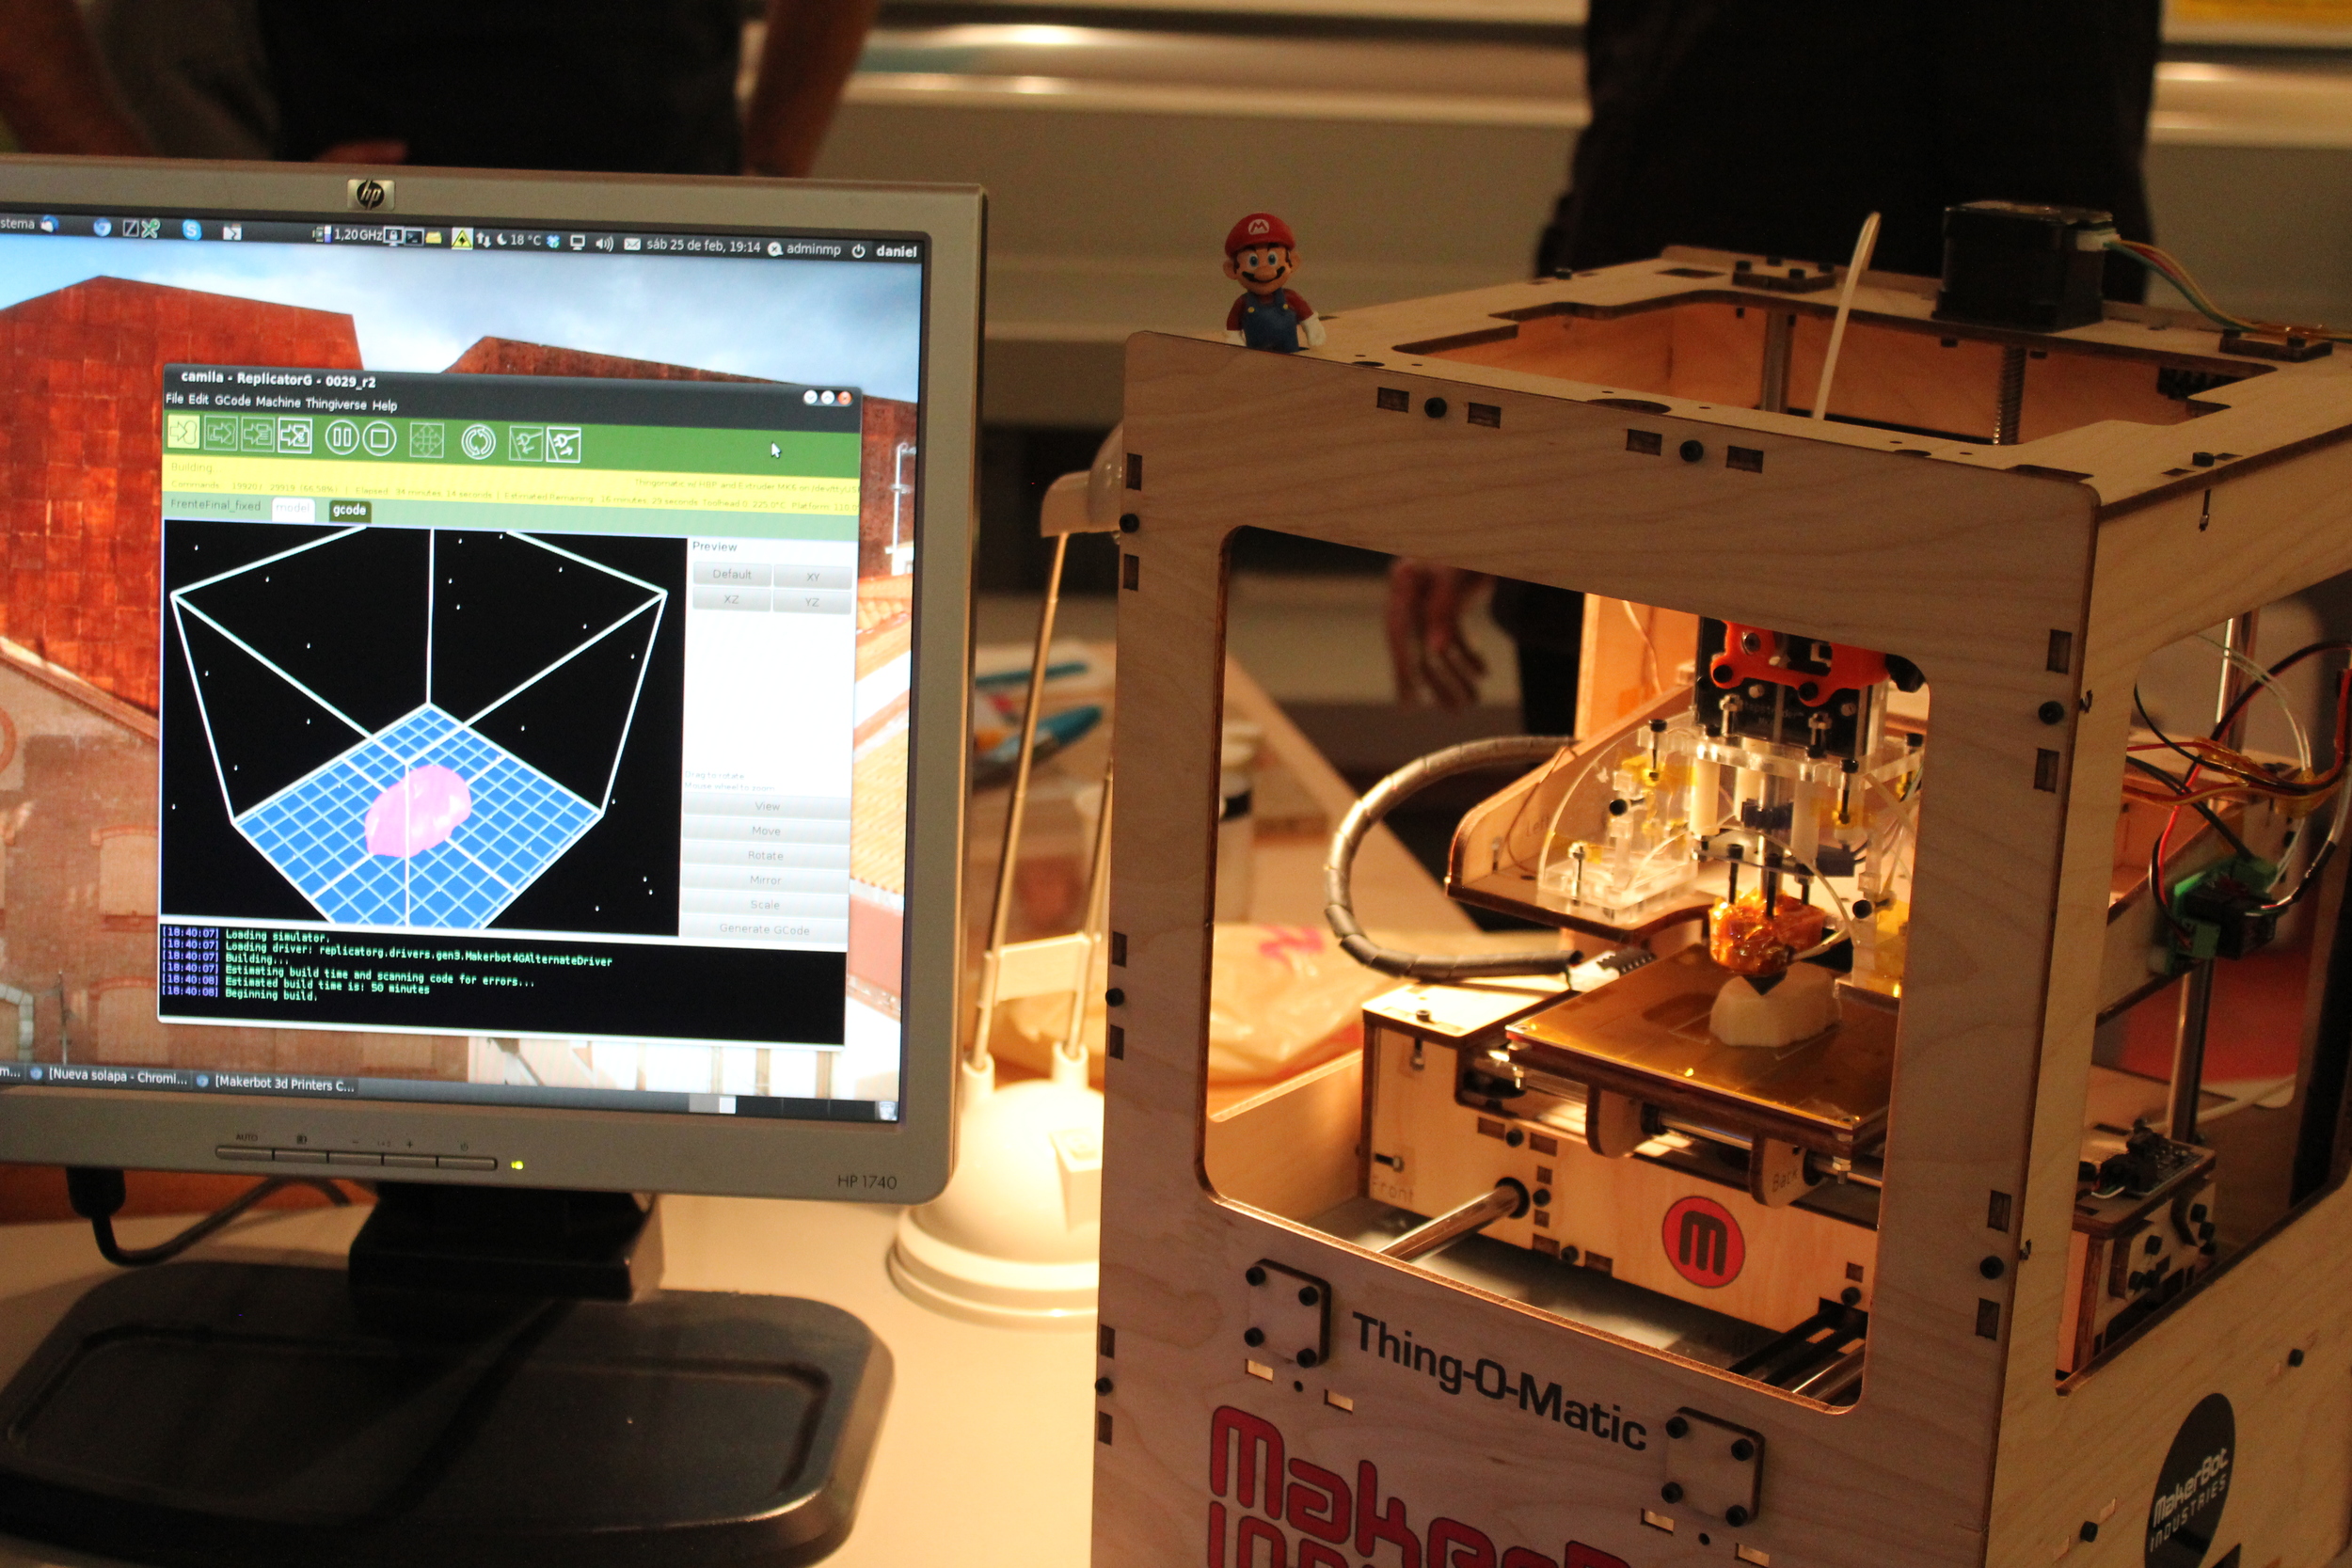
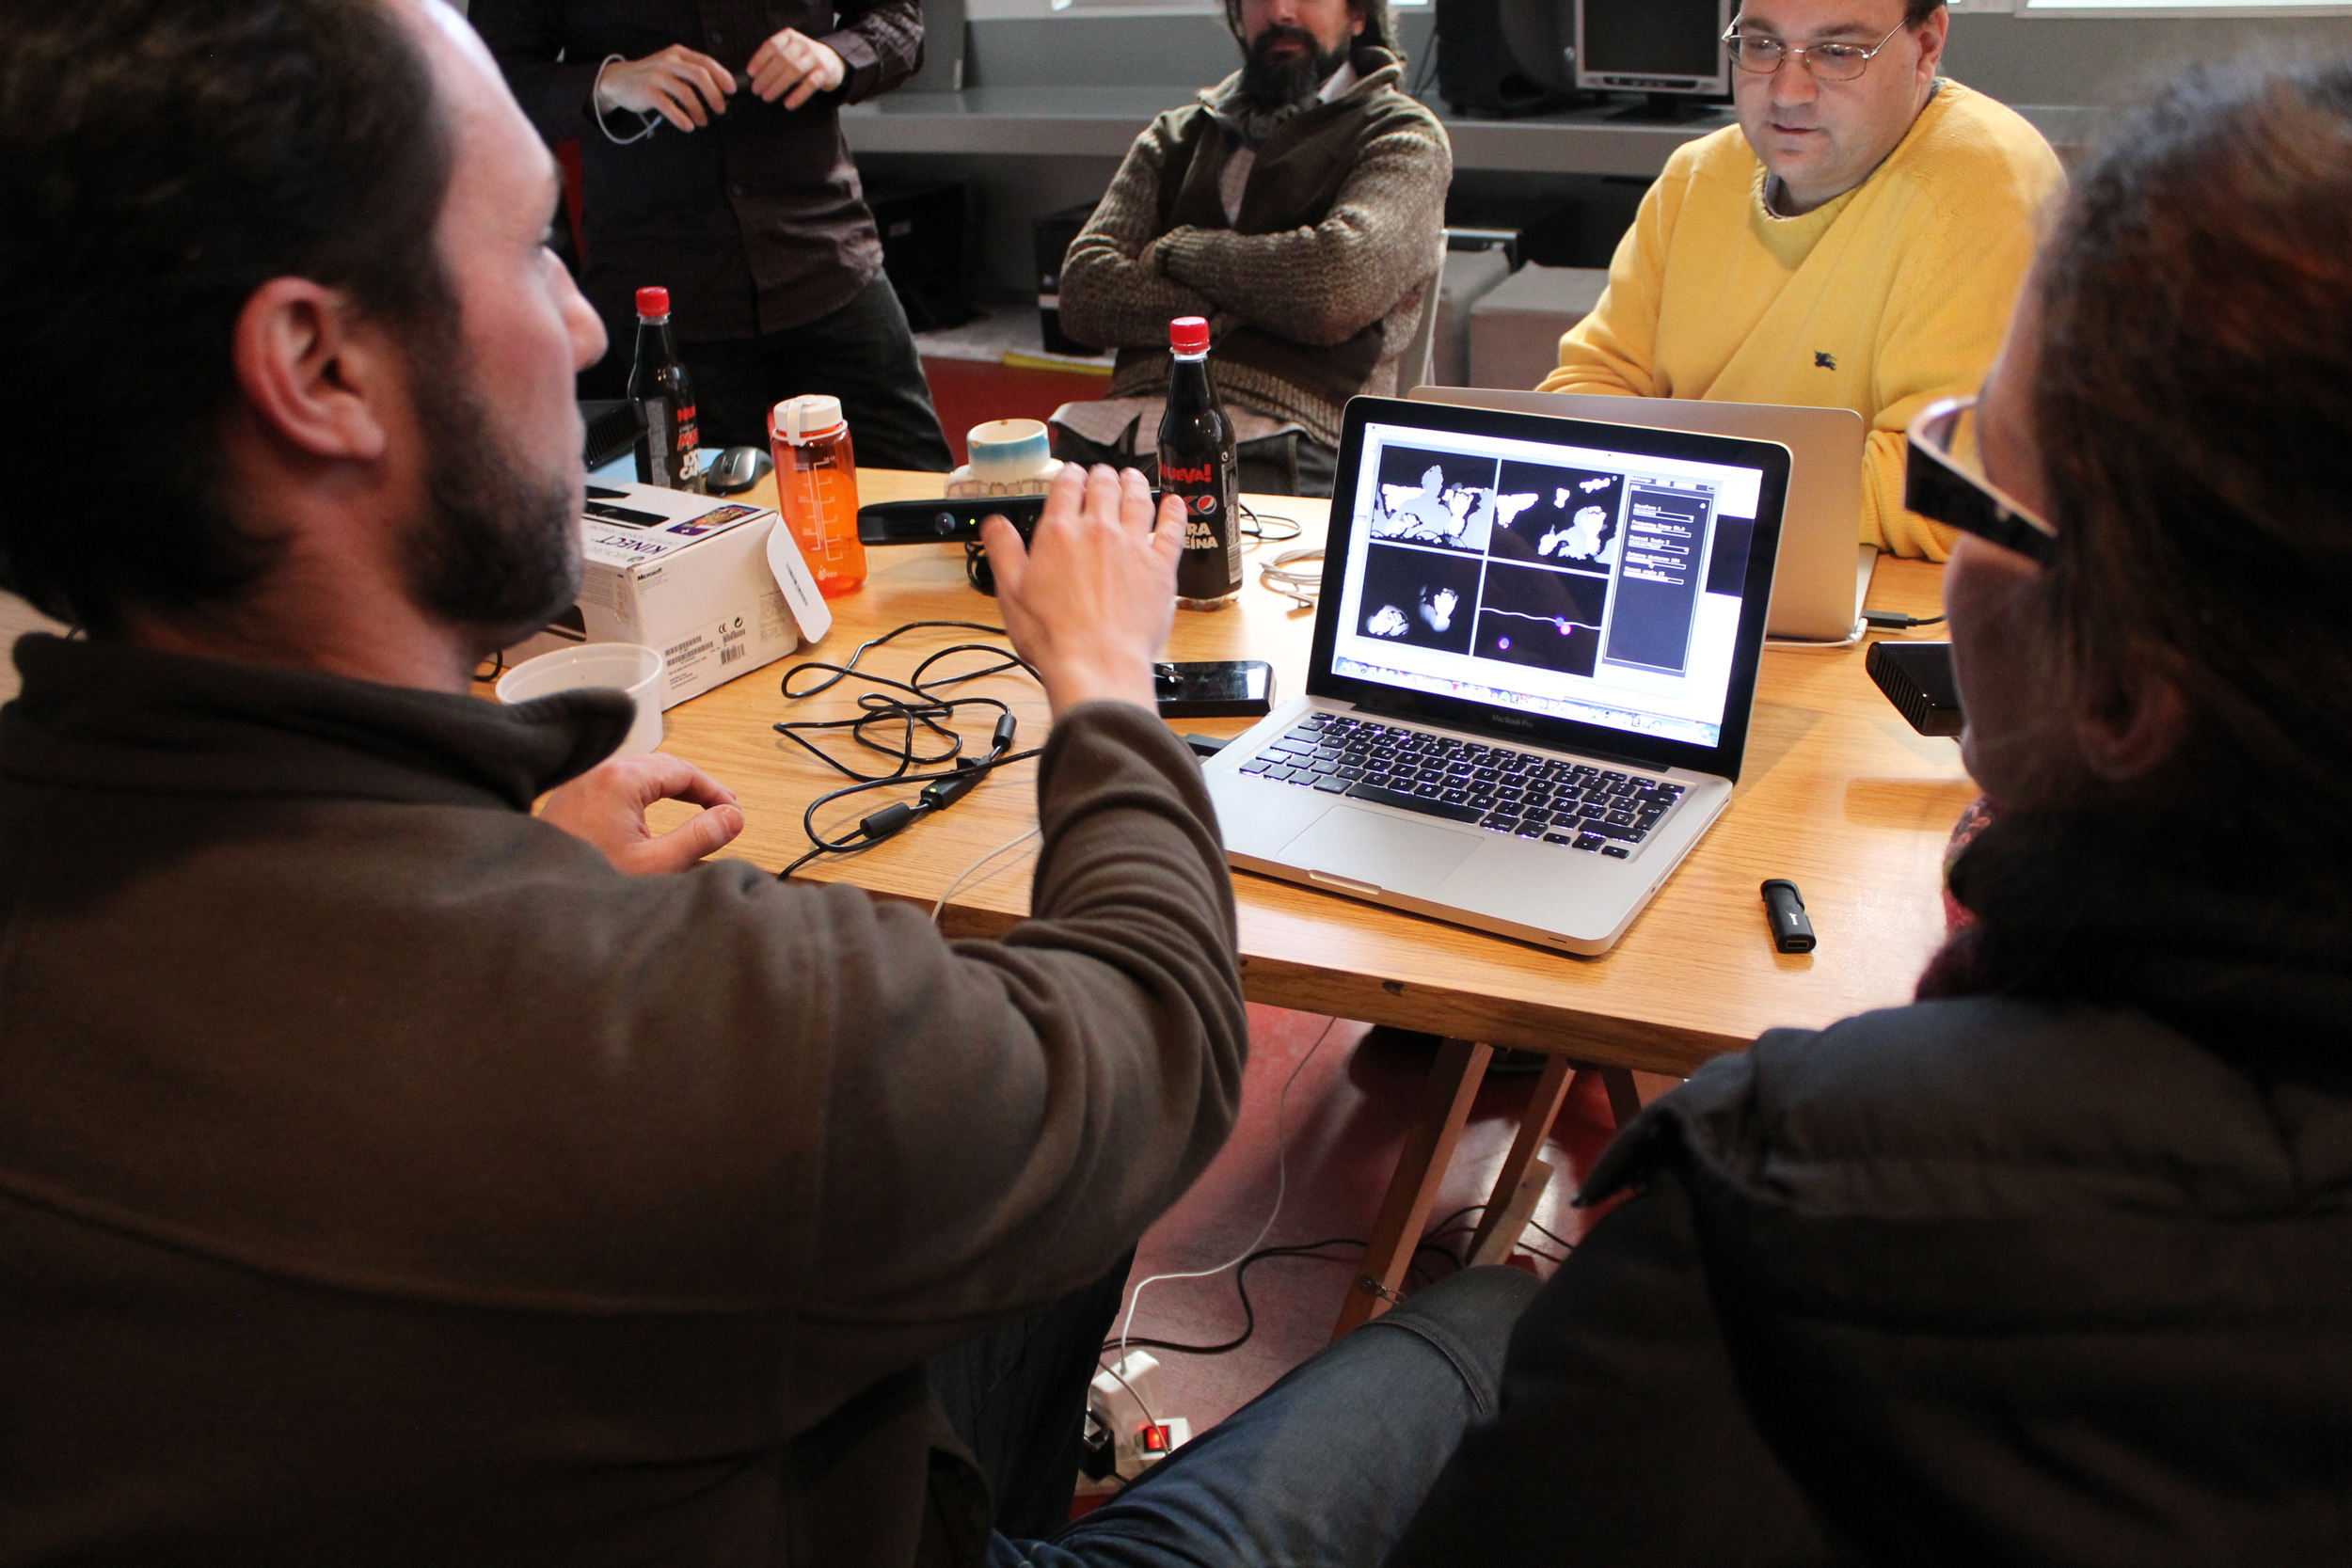
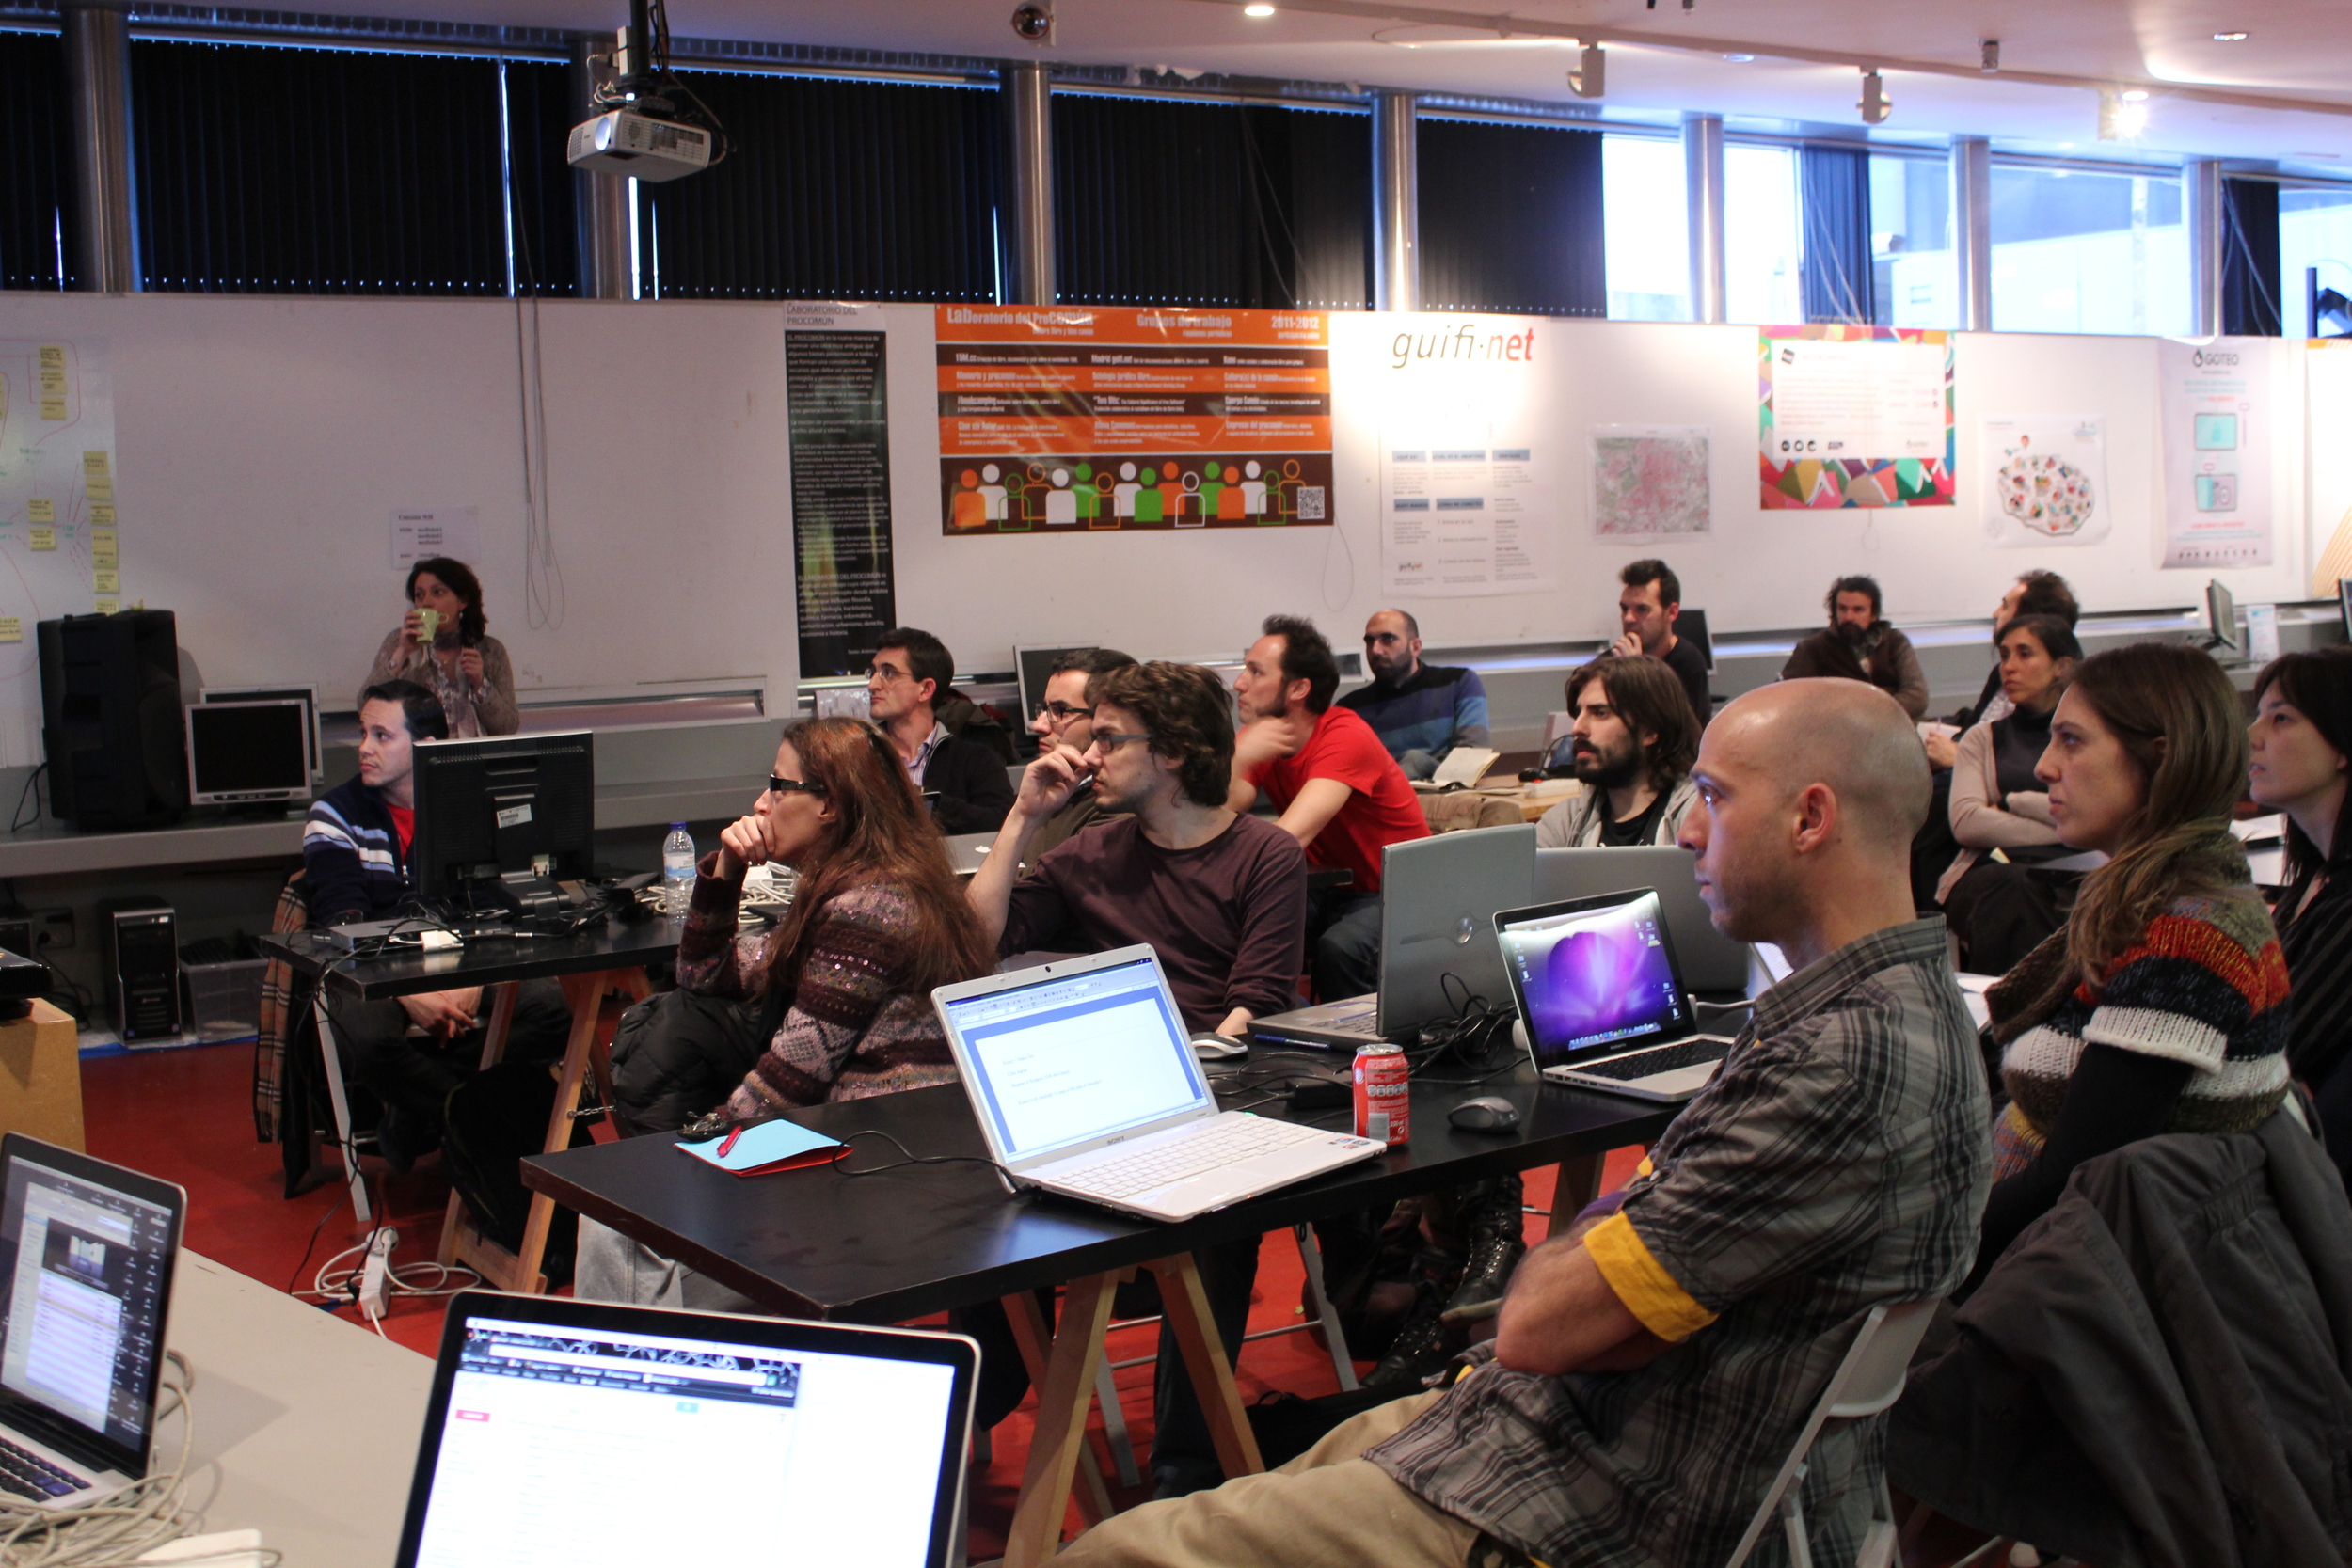
3D Scanning Workshop at Medialab Prado
A 3 day workshop held at Medialab Prado to explore the possibilities of using a Kinect sensor as a 3d scanner and use it for 3D printing.
Kinect + Makerbot
Medialab-Prado Feb 23-26, 2012
by: Chris Sugrue, Gorka Cortázar, Bernat Cuni, Daniel Pietrosemoli
A 3 day workshop held at Medialab Prado to explore the possibilities of using a Kinect sensor as a 3d scanner and use it for 3D printing.
Participants were able to experiment capturing 3D data, editing and optimizing 3D meshes using open source tools and 3D Printing the captures with a Makerbot 3D Printer.
Tools:
Replicator: http://replicat.org/
SimpleNI for Processing:
http://code.google.com/p/simple-openni/
Modified Processing Code to Export to STL
http://editor.medialab-prado.es/processingNI-STL
-- requires ModelBuilder Library:
http://code.google.com/p/codeandform/downloads/detail?name=ModelBuilder%20v0004.zip&can=2&q=
Processing Export PLY
(experimental)
http://editor.medialab-prado.es/kinectProcessingPly
exports points only
Processing Export PLY With Color
http://editor.medialab-prado.es/processingNI-PLYColor
Poisson Reconstruction in Meshlab
(convertir nube de puntos a una malla, es un video para instrucciones están el los commentarios debajo)
http://vimeo.com/20933872
3D Tools
Meshlab: http://meshlab.sourceforge.net/
Blender: http://www.blender.org/
Mesh Mixer: http://www.meshmixer.com/
NetFabb: http://netfabb.com/
OpenFrameworks links:
http://www.openframeworks.cc/download
https://github.com/openframeworks/openFrameworks
directorio OF addons: http://ofxAddons.com
ofxKinect: http://github.com/of+Theo/ofxKinect
ofxOpenNI: http://github.com/gameoverhack/ofxOpenNI
ofxOpenNI2: http://github.com/arturoc/ofxOpenNI2
Ejemplos de ofxKinect para OF:
Processing links:
http://processing.org
Simple NI
http://code.google.com/p/simple-openni/
http://www.shiffman.net/p5/kinect/
Modified Processing Code to Export to STL
http://editor.medialab-prado.es/processingNI-STL
-- requires ModelBuilder Library:
http://code.google.com/p/codeandform/downloads/detail?name=ModelBuilder%20v0004.zip&can=2&q=
Otra opción para Windows:
https://github.com/hardikpandya/kinect-processing
Example of Stl Code without Stl Saving
(this example is just drawing the point cloud,and is just a useful comparison to see the separate parts of the code)
http://editor.medialab-prado.es/processingNIPoints
Examples from Making Things See:
https://github.com/atduskgreg/Making-Things-See-Examples
Tutorials
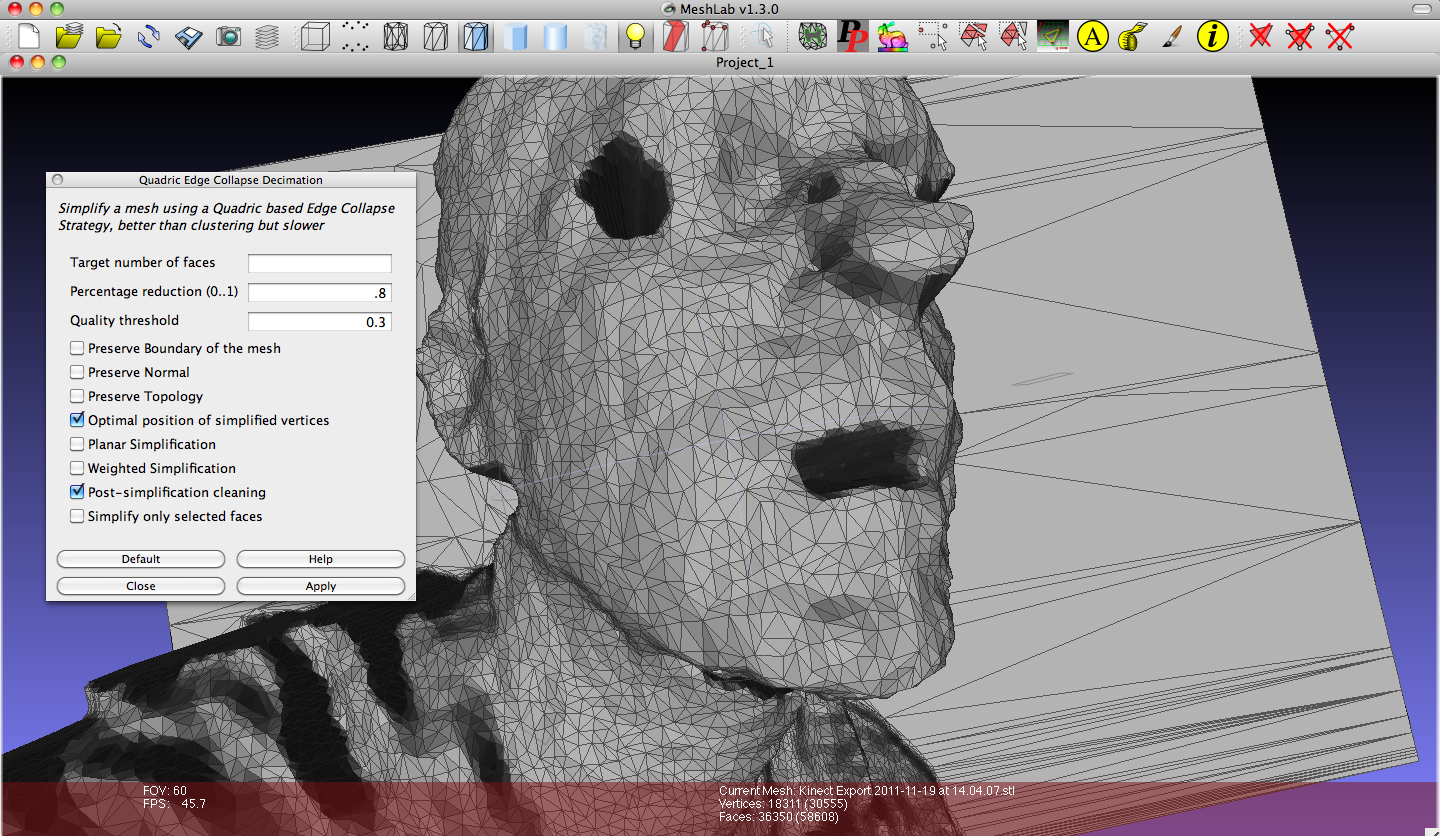
Optimizing meshes from KinectToSTL app for 3DPrint
KinectToSTL APP: https://github.com/downloads/kylemcdonald/Makerbot/KinectToStl.zip
- Capture STL
- Lower the mesh density (for easy processing): Meshlab / Filters > Remeshing,Simplification and Reconstruction > Quadric Edge Collapse Decimation: Percentage reduction: 0.8 (repeat until get a nice mesh of around 50k faces)
- Smoothen the mesh (if needed):
Select faces to smooth (don't select the base plane)
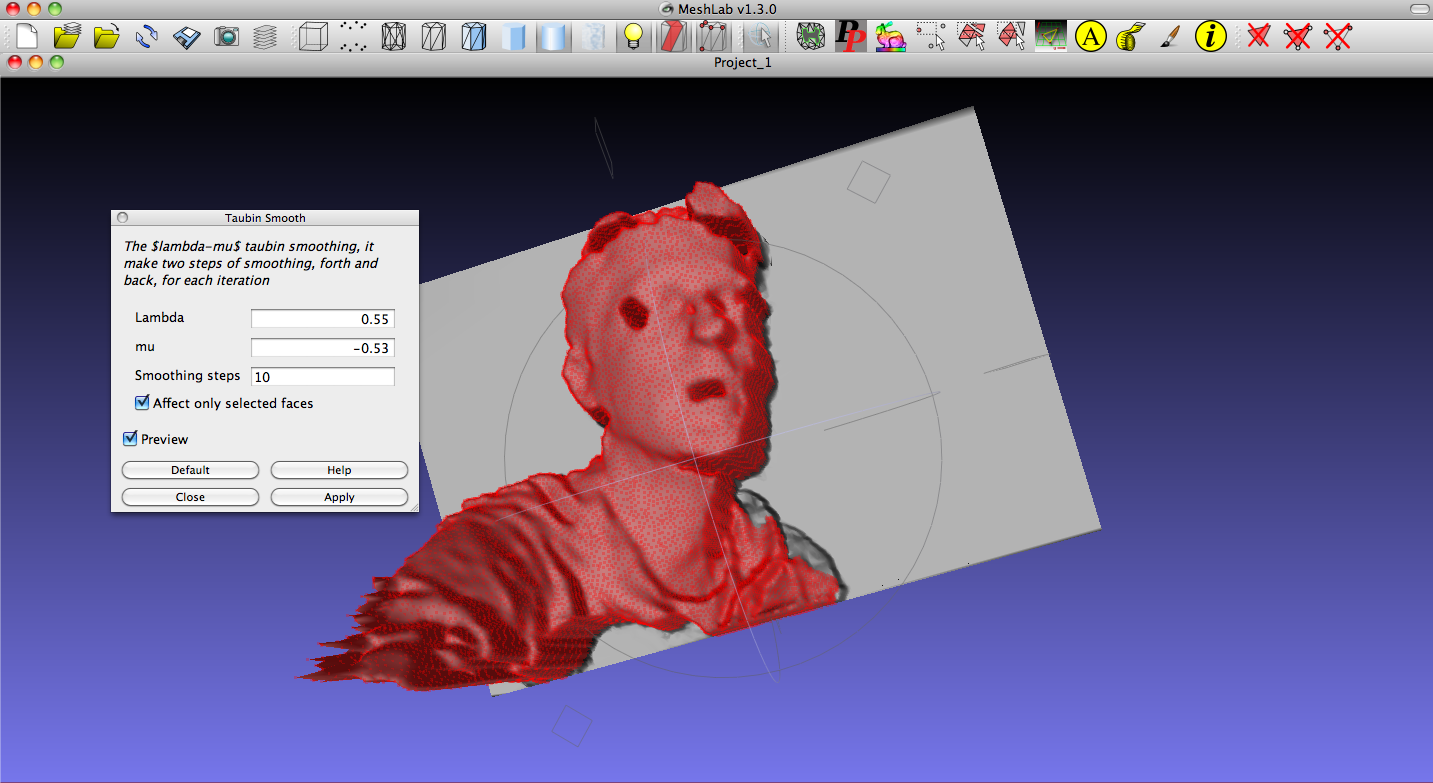
Filters > Taubin Smooth: / check "Affect only selected faces" Preview and test. (Lambda 0.55 gives a nice smooth surface maintaining the general geometry) - Scale your model.
Edit > Measuring tool: Click to points to know the actual dimensions of the 3DModel
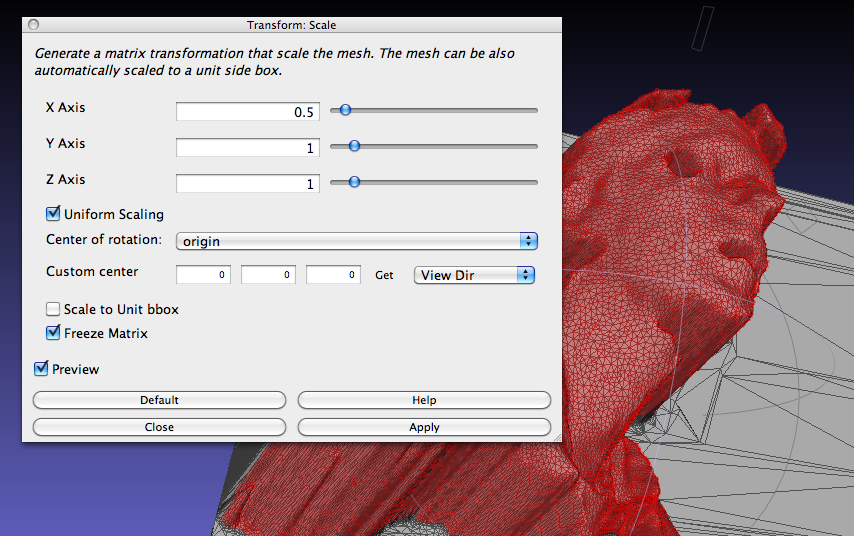
Change dimensions accordingly: Filters > Normals, Curvatures and Orientation > Transform:Scale / Set scale factor, uniform scaling, Freeze Matrix. - File > Export mesh as... / STL
- Clean up STL to minimize errors during GCode generation:
Use the cloud services from Netfabb to close holes, remove double vertex, manifold edges... http://cloud.netfabb.com/ upload your file, wait & download the fixed model.
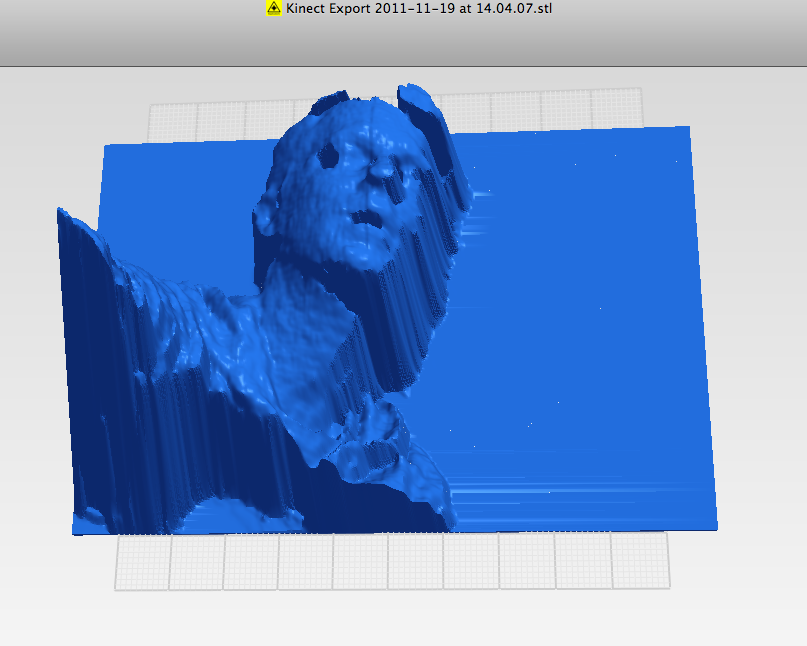
From Kinect capture in Processing - to printable file
- Capture the object/scene / http://editor.medialab-prado.es/processingNI-STL
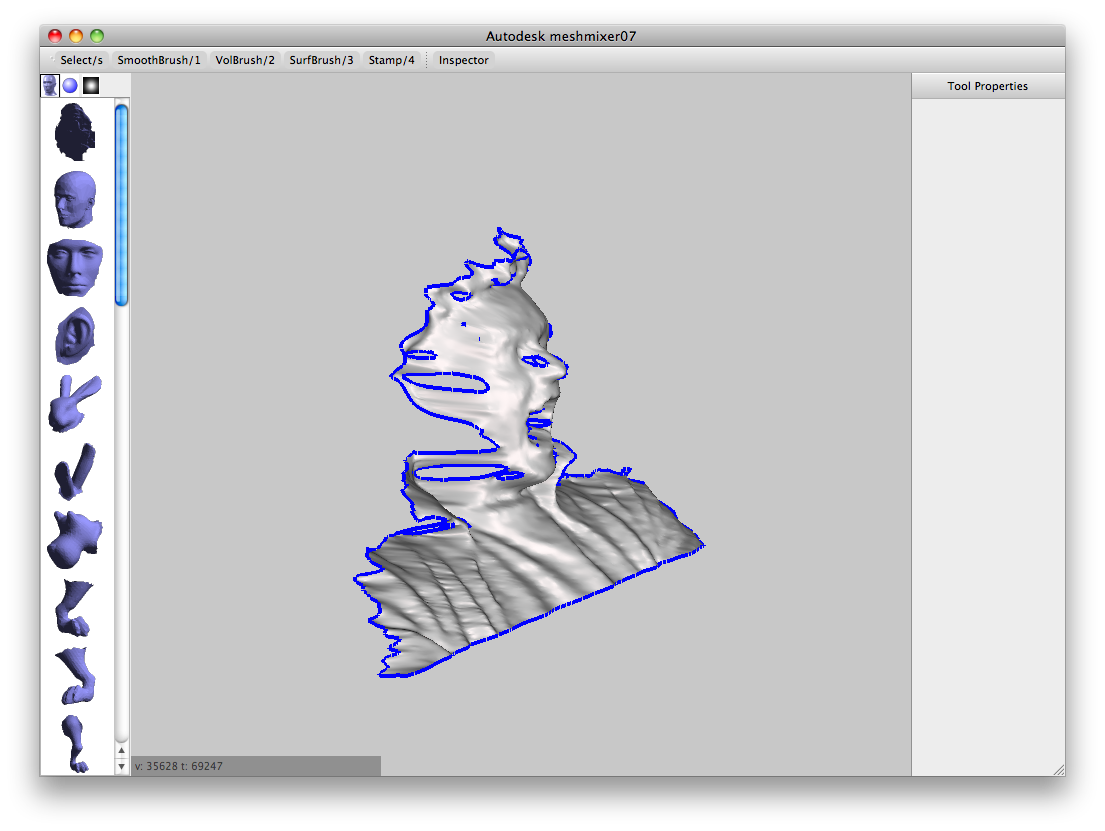
- Open the STL in MeshMixer / http://www.meshmixer.com/ d
2.1 if you have problems opening the STL. Convert it to .OBJ in Meshlab and import the .OBJ - Decide the orientation you want to print. (Makerbot has better resolution on the vertical axis)
- Clean up the model:
Select the parts you want to print. (click & paint. mousewheel=brush size).
invert selection (i),
Discard (x) - Make the flat base:
Select / all (command+A)
Edits / Extrude: Offset= -0.5, Harden=0, Density=5, Direction=Constant, EndType=Flat, - Smoothen edge if needed: SmoothBrush (1) and paint along the extruded edges.

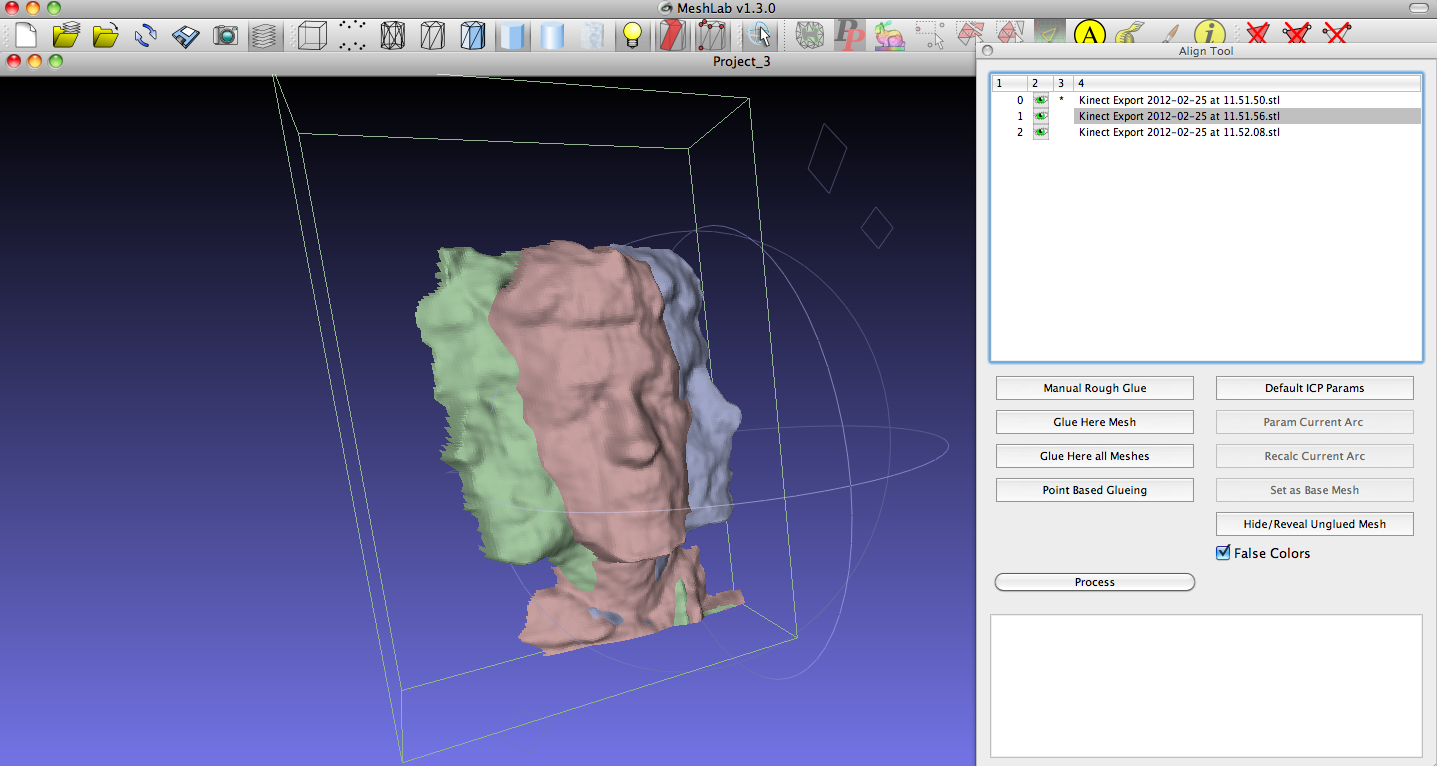
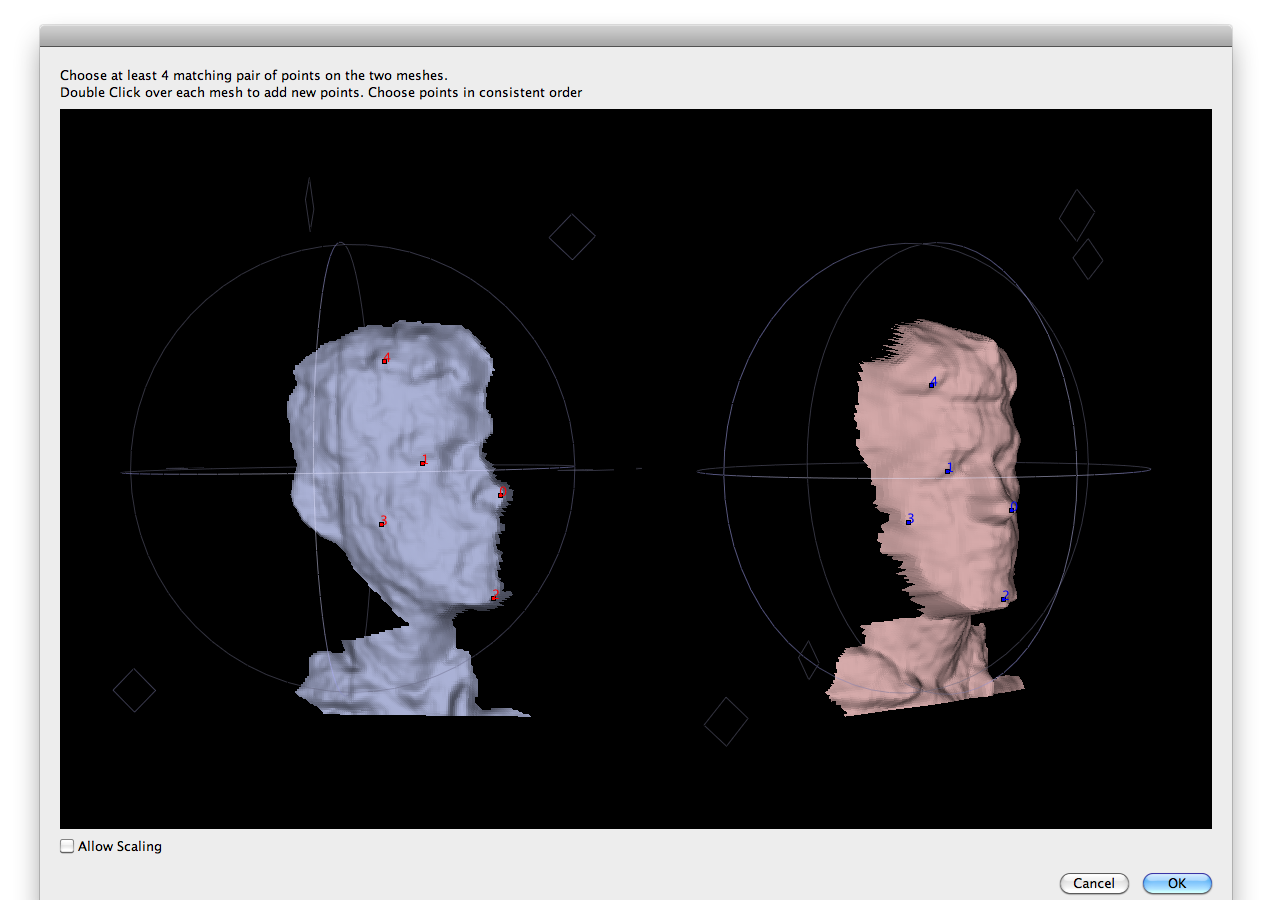
Aligning multiple Kinect captures
- Open all the files in Meshlab.
- Launch the align tool Edit/Align (yellow circle with black A on the menu bar)
- Select the mesh you want to use as base to position the others. click "Glue Here Mesh", a star appears next to the layer, meaning that the mesh is fixed on the space.
- Align the other meshes:
Select one layer, click "Point Based Glueing": a new window appears with both meshe side by side. Dobleclick to add points where you see the same geometry. (nose with nose, eye with eye, chin with chin...) add a minimum of 4 points, and repeat the same process for as many meshes you got. Click "Process" and the meshes will be aligned. - 5. Merge the aligned meshes into one mesh: Filters>Layer and Attribute Management >Flatten Visible Layers.
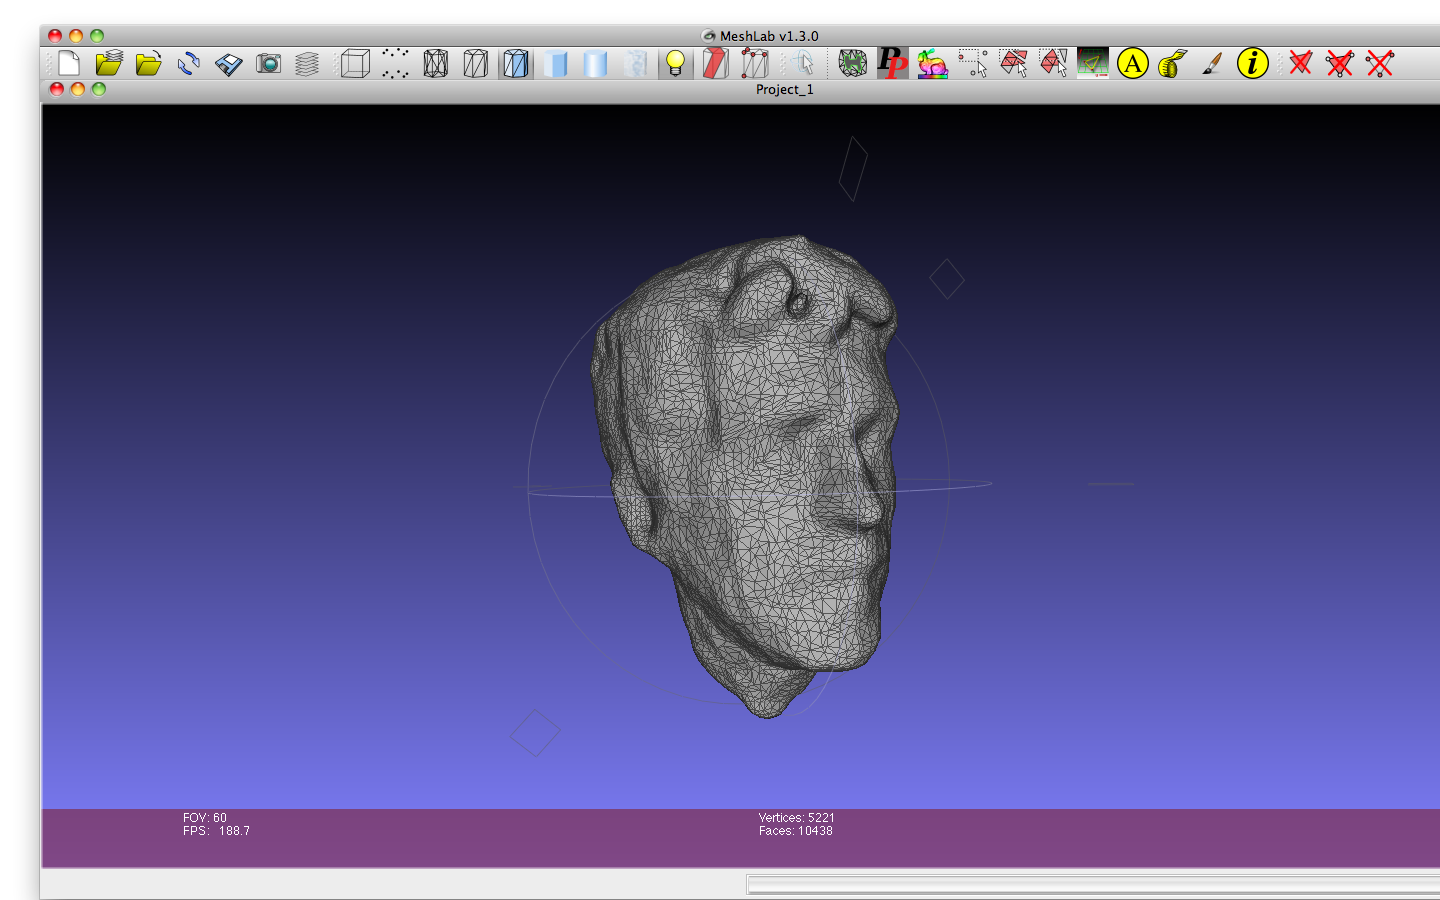
- Create a continuous mesh based on the aligned geometry:
Filters > Point Set > Poisson Reconstruction.| Octree Depth 11 = high def. mesh (Solver Divide = lower than Octree Depth, 9 works ok) It might take a while to compute.
Lower the mesh density (for easy processing): Filters > Remeshing,Simplification and Reconstruction > Quadric Edge Collapse Decimation: Target Number of Faces: around 30000
Smoothen the mesh (if needed): Filters > Taubin Smooth: preview and test.
Pointcloud Reconstruction
software: http://meshlab.sourceforge.net/
librerias: http://www.cgal.org/, http://pointclouds.org
meshlab blog: http://meshlabstuff.blogspot.com/
meshing point clouds: http://meshlabstuff.blogspot.com/2009/09/meshing-point-clouds.html
3D Printing
3D Printing processes: Stereolithography SLA | Fuse Deposition Modeling FDM | Selective Laser Sintering SLS | videos: http://vimeo.com/imaterialise/videos
Industrial 3D Printers: http://www.stratasys.com/ | http://www.3dsystems.com/ | http://www.objet.com/ |http://www.zcorp.com/
Home 3D Printers / DIY: http://reprap.org/wiki/Main_Page | http://www.makerbot.com/ |http://blog.ultimaker.com/ |
Business of 3D Print: http://www.economist.com/node/18114327
The Future of Fabrication: Neil Gershenfeld http://goo.gl/APlNj
3D-printing consumer products http://www.mgxbymaterialise.com/%7C http://www.shapeways.com/ | http://i.materialise.com/ | http://www.sculpteo.com/en/
Form vs. Funciton http://goo.gl/c10no 3D printing ariplane parts in Titanium
Printing avatars: http://www.figureprints.com/
Art & Design: 3D-print artist in residence http://goo.gl/TZ4xT | 3D-print graffiti http://goo.gl/nfpX8 | Elephantiasis lamp http://www.platform21.nl/page/3915/en | City hacks http://www.fabrique-hacktion.com/| Fabrique Hacktion http://www.fabrique-hacktion.com/
Medical & Prosthetics http://www.bespokeinnovations.com/ | http://goo.gl/6A5eZ
Generative Design
Nature algorithms http://n-e-r-v-o-u-s.com/shop/concepts.php
words to object: lightpoem http://www.shapeways.com/creator/lightpoem
data driven design: streets clock http://goo.gl/DiCTp
interaction driven design http://www.interactivefabrication.com/projects/beautiful-modeler/ | http://www.fluid-forms.com/design-your-own/Fluid-Cassius-Lampshade | Artisan Electronique by UnfoldStudio http://unfold.be/pages/5/items/90
Scan & Print http://www.interactivefabrication.com/projects/fabricate-yourself/ |
Genetic evolution http://endlessforms.com/ |
Misc
Guide to chop off parts of a model with a cube in Blender:
http://makeprojects.com/pdf/make/guide_1220_en.pdf
Kyle Mcdonald MakerBot prints:
http://www.makerbot.com/blog/2011/05/26/3d-printing-with-kinect/
Kyle & Zach course about 3D sensing and visualization
http://3dsav.blogspot.com/
Tutorial con meshlab:
http://3dsav.blogspot.com/2011/03/reconstructing-and-mesh-from-point.html
Mesh reconstruction in meshlab: poisson, marching cubes
http://blog.reprap.org/2011/09/being-in-3d-world-with-3d-printer-what.html
Kyle & Golan kinect workshop at future theater
http://futuretheater.net/wiki/Kinect_Workshop
3D Objects:
http://www.thingiverse.com/

Black Ceramics | OctoCup
Shapeways introduced Black glazing for 3D-Printing in Ceramics,
using the One Coffee Cup a Day designs as reference ;)
Shapeways introduced Black glazing for 3D-Printing in Ceramics,
We are happy that they used the One Coffe Cup a Day project as models,
the printed cups look sleek, fetish & beautiful.

Get the OctoCup in Black Ceramics here.

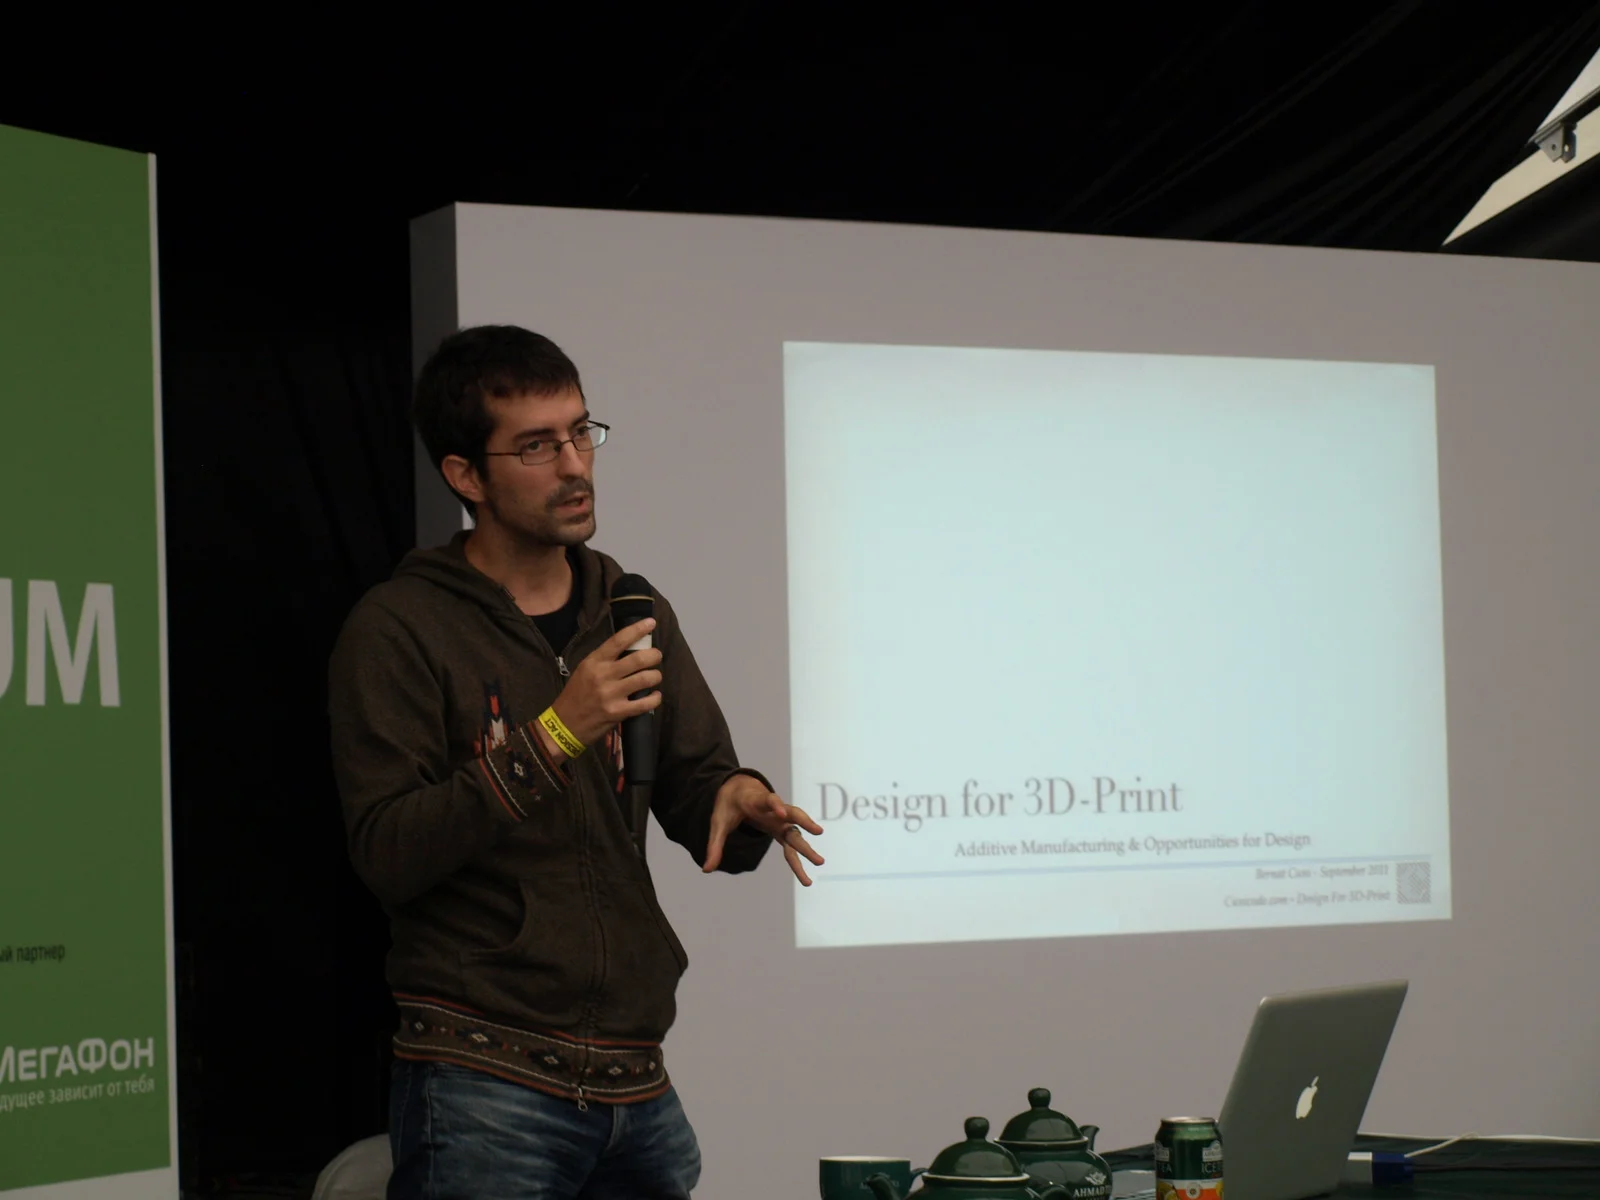
Additive Manufacturing & Opportunities for Design | Article
Additive Manufacturing for final products mights reduce the product development time and costs due to the immediacy of the production process, creating an opportunity for the product design industry to design tools and systems to create products with parametric values and custom-defined features.
Design & Make
Additive Manufacturing for final products mights reduce the product development time and costs due to the immediacy of the production process, creating an opportunity for the product design industry to design tools and systems to create products with parametric values and custom-defined features.
Background
Referring to Additive Manufacturing as “the process of joining materials to make objects from 3D model data, usually layer upon layer, as opposed to subtractive manufacturing methodologies, such as traditional machining. Commonly known as 3DPrinting, additive fabrication, additive processes, additive techniques, additive layer manufacturing, layer manufacturing and freeform fabrication”
Paying special attention to the usage of Additive Manufacturing to create final products, not prototypes. Understanding final products as: “objects ready to use by people”
Digital Fabrication refers to the process of translating digital design into a physical object.
Tools to enable digital fabrication include existing ones like CNC milling, LaserCutting and all computer controlled machines. A relevant part of Digital Fabrication tools & processes include the Additive Manufacturing, commonly know as 3D-Printing, which include SLS, SLA, FDM among others.
A next step on Digital Fabrication is when computers don’t just control tools to manipulate matter, but they compute the matter directly; example: a wood log is a series of atoms arranged in a particular way, if you could arrange those atoms in another way, theoretically you could reshape that wood log into a wood chair, so we could have computers to send instructions to matter to adopt certain shapes and behaviors, all digitally. Experiments are under development to computer control the way molecules are arranged.
Digital Fabrication is not just about the tools, but about the transformation on how goods are designed and made, and the socio-cultural changes that this imply.
As an analogy to what Personal Computing meant in the past 20 years, now we can talk about a Personal Factory, where people will have access to production processes.
Making products with Additive Manufacturing
Additive Manufacturing shortens radically the time from design to production, making the product development & production process quicker than ever. When it takes almost no-time to from a finalized design to a real product,
This reduces the cost of change, meaning that changes on the design do not exponentially add costs to the final product.
In a traditional mass manufacturing approach, the design stage had to define and finish the design of a product as accurate as possible because after that was done, a whole set of time and cost consuming steps took place: design verification, engineering, tooling, manufacturing tests, first batches…
Using Additive Manufacturing to produce final product, those steps are shortened in time and cost: From digital design to 3D-Printed piece takes almost no time. (excluding printing time which is being reduced drastically as the additive manufacturing tools technically evolve.
Designing for Additive Manufacturing
If we understand that a product made via Additive Manufacturing has reduced product development associated time and costs, we can question the product design process. Traditionally, product design task was to define a product as much as possible in order to avoid future changes and modifications, but when those changes and modifications don’t necessarily imply exponential rise of time and costs, why design should totally define a product’s shape & details?
Additive Manufacturing for final products offers the chance to the design industry, to approach the design process differently and define rules instead of products, parameters instead of shapes & details. Generative Design, Parametric Design and direct 3D manipulation interaction interfaces might be the tools product design can use to design for Additive Manufactured products.
Following, a set of examples that take a parametric and user-defined design approach:
Ring.ShapeWright
by: macouno / Dolf Veenvliet
http://ring.shapewright.com/
iRing
by: Dr. Eyal Nir, founder of ParaCloud
iRing3d.com/
Beautiful Modeler
by: Karl D.D. Willis
http://interactivefabrication.com
Endlessforms
by: Jeff Clune, Jason Yosinski, Eugene Doan & Hod Lipson from Cornell University
http://endlessforms.com/
Be Your Own Souvenir
by: http://www.blablablab.org/
L’Artisan Electronique
by Unfold Studio. Design for performance at Z33 art gallery.
http://unfold.be/pages/5/items/90

machine test | 3DPhome.ru
We met with 3DPhome.ru distributors of a commercial home 3D-Printer,
and we had the chance to ran a print test of the OctoCup.


The print took around 4 hours, and the results are pretty amazing, (compared with the RepRap test we did some time ago)
Some pieces printed with 3dphome.ru‘s printer:
IED | Master in Design Management
Bernat Cuni collaborates with the Istituto Europeo di Design (IED) giving a workshop on Design Entrepreneurship at the Master in Design Management in Barcelona.
Bernat Cuni collaborates with the Istituto Europeo di Design (IED) giving a course on Design Entrepreneurship at the Master in Design Management in Barcelona.
Within the two weeks program the students explored the fields of DesignDoing / Mass Customization / 3DPrinting / Generative Design / OpenHardware / MicroManufacturing / Rights on Digital Content / Niche Markets / New Roles of Design.
The Master in Design Management aims to prepare professionals that integrate and master both User Centered Design innovation, project management, strategic planning AND core business management principles in order to guarantee a smooth fit in the business environment and maximize the contribution.
Aimed at: Design, Engineering, Marketing and Business Administration professionals with at least three years of experience in their fields willing to master the Design Management principles in order to effectively apply them in their companies to contribute make better business decisions.

Tutorial | Prepare models for 3D-Printing
Step-by-step tutorial on how to prepare a model for 3D-printing.
Tutorial published at 3D Artist Magazine
Following up with the story published at the 3DArtist Magazine, cunicode prepared a step-by-step tutorial on how to prepare a model for 3D-printing.
Tutorial published at 3dartistonline.com
3D printing is a form of additive manufacturing technology where a three-dimensional object is created by laying down successive layers of material.
With a 3D printer, we can create objects impossible to make as a single piece by other means of production. It is possible to print objects within objects, hollow parts, interconnected parts, moving pieces, complex twists, and intricate details.
There are numerous 3D printing technologies out there; stereolithography (SLA), selective laser sintering (SLS) and fuse depositing modelling (FDM) to name but a few, and each has pros and cons.
When you are considering preparing a piece for 3D printing – in this example, we’ll be producing an object in ceramics – we must first consider the design constraints before we select the 3D printing process.
In the case of ceramics, the minimum wall thickness possible is 3mm; the maximum detail is 2mm. In other processes, such as SLS, the minimum wall thickness might be as thin as 0.7mm and the minimum detail as sharp as 0.2mm, so it’s very important to know the process.
Something else to consider is cost – 3D printing is not necessarily a cheap process, so try to use as little material as possible.
Step 1 – Modelling
You can pretty much 3D print everything from organic ZBrush sculptures, mathematically complex models and sleek product designs, to your computer game avatar. Whatever you’re designing, keep in mind the real world. Your 3D model will become an actual object, so you must consider dimensions, strength and gravity.
So, for example, if you want to 3D print a figurine, make sure it will stand on its own two (or however many) feet, or consider adding a base.
In this case, we are modeling a coffee cup (otherwise known as an ‘Octocup’). Since we want it to stand on a table and hold liquid (the function of a cup), we can’t go crazy with asymmetrical shapes because the cup could fall on its side. The model itself should be a mesh, preferably an OBJ or STL file.

Step 2 – Hollow the shell
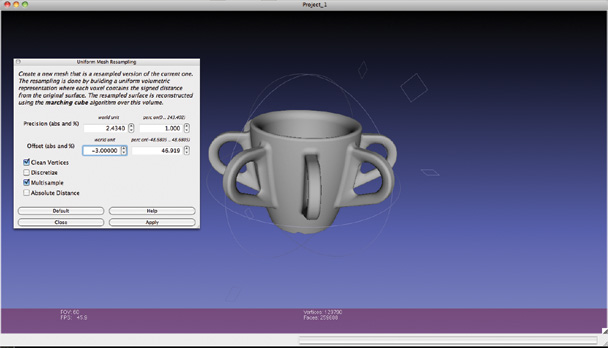
As mentioned before, in order to save on printing materials, it’s advisable to make a shell of your model. Again, depending on the printing process and material, the wall-thickness requirements vary. In this case, we will use a 3mm wall thickness. To do so, we can use the fantastic software MeshLab, which is ideal for this kind of task.
What we need to do is create an offset of our model with the desired thickness, so open the model and navigate to Filters > Remeshing > Uniform Mesh Resampling (this may differ, depending on your software). Change the settings to Precision 1.0, Offset value -3 (desired wall thickness) and check both Clean vertices and Multisample. Now we should have a nice inner shell. We now need to invert its normals in order for it to be understood as a hollow model (Filers > Normals, Curvature and Orientation).
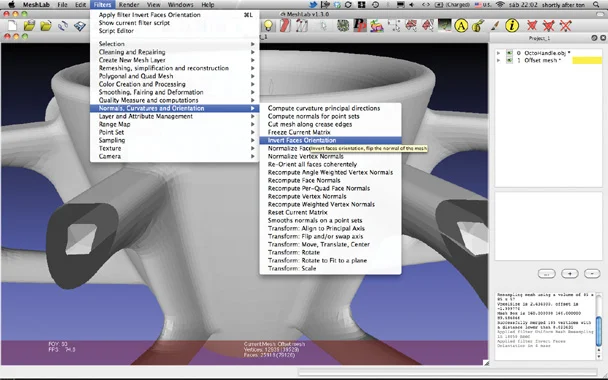
Invert the orientation of the inner shell: click View > Show layer dialog and select the offset layer. Click Filters > Normals > Invert Faces Orientation. To make the final file, click Layer > Flatten Visible Layers File > Export Mesh as. Next we just need to add a little hole for the excess material to escape. You can do that with your modelling software – normally, a hole with a diameter double the wall thickness should be enough, so in this case that means a 6mm diameter.

Step 3 – Clean up your model’s mesh
3D printers are quite picky and love well-constructed models, so we need to be tidy and accurate when preparing our models for this process. We should fix non-manifold edges (shared edges) and unify the Normals direction. To further cleanand verify the model, we will use netfabb Studio Basic, which is a free piece of software.

Open your file and run the automatic repair to close holes in the model. Navigate to Extras > Repair part, and then click Automatic Repair > Apply Repair. Save your model via Part > Export part > As STL (binary) and choose a suitable filename for it.
To fix possible intersecting faces that might present one or two problems during the 3D printing stage itself, we can upload it to netfabb’s cloud for processing. The file is now finally read to go!

From 3D to reality
You can take your file to any 3D printing service provider, or your local fab lab or hackerspace, and they will print your object – no problem. What they will do is translate the file into G-code (instructions to the machine to move and build your object). To get an idea of how this is done, check out the Skeinforge application, which is used to drive the RapRap DIY 3D printers.
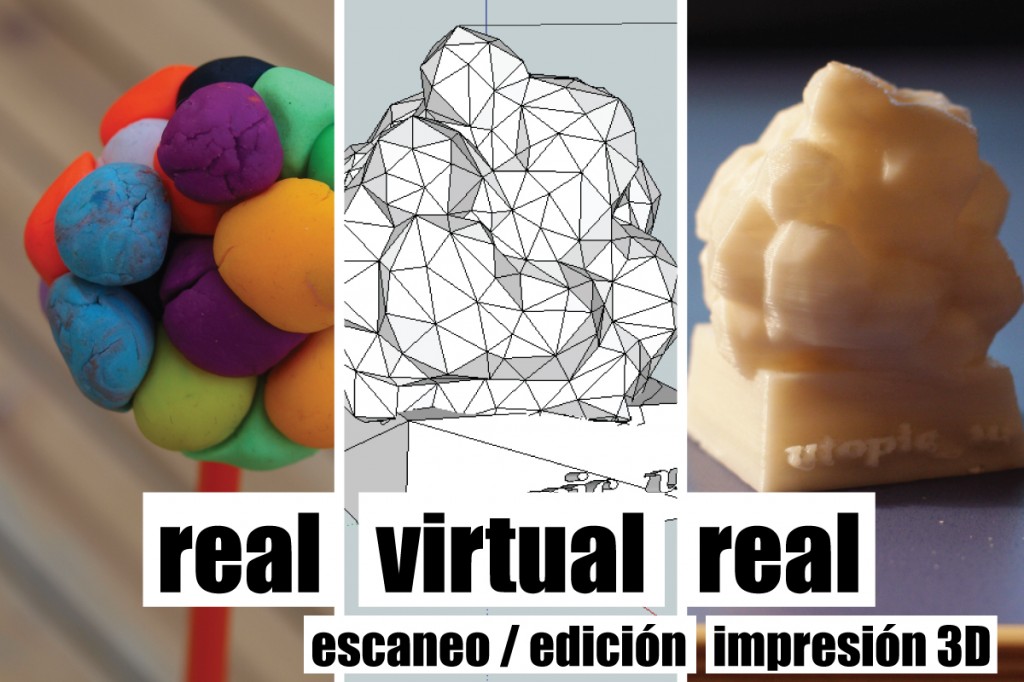
3DScanning + 3DPrinting Workshop / Madrid
Cunicode will give a 1 day workshop at the Utopic_School to explore DIY 3DScanning & 3DPrinting.
Cunicode will give a 1 day workshop at the Utopic_School to explore DIY 3DScanning & 3DPrinting.

Experimentos con escaneo e impresión 3D / Bricolaje atómico-digital
En el taller los participantes podrán:
- Explorar las posibilidades de la impresión en tres dimensiones con herramientas DIY al alcance de todos.
- Experimentar con el hecho de poder fabricarnos nuestros propios productos y soluciones materiales.
Y por último podrán:
- Generar un objeto digital a partir de la manipulación física de otro objeto.
the coffee cups project | press
Thanks to all the media that wrote and posted about the One Coffee Cup a Day Project!
The KleinBottle Cup at BoingBoing!
The Cups at Ponoko.com
The OctoCup at Siggraph 2011
Our friends from 3DArtist Magazine spotted the Octocup during Siggraph 2011.
Sarah & the tiny ocop-cup
Coverage at the great Art & Design webzine Ignant.de [German]
The cups at SwissMiss
3D Printed cups at Wired Magazine
cunicode @ Elisava Masters
Course at the Postgraduate Diploma in Product Conceptualisation, challenging the participants to re-think the roles of the conteporary designer.
Within the Master’s Degree in Product Design program, cunicode ran a course at the Postgraduate Diploma in Product Conceptualisation, challenging the participants to re-think the roles of the conteporary designer.
We explored & discussed the fields of mass customization, generative design, niche markets, hackability & open hardware.
3DArtist Magazine | Article
One Coffee Cup a Day featured article at the 3D Artist Magazine.


natural history museum | inspiration
An afternoon visit to the Natural History museum in Barcelona fueled some ideas for an upcoming collection of 3DPrinted items.
An afternoon visit to the Natural History museum in Barcelona [MuseuBlau] fueled some ideas for an upcoming collection of 3DPrinted items.


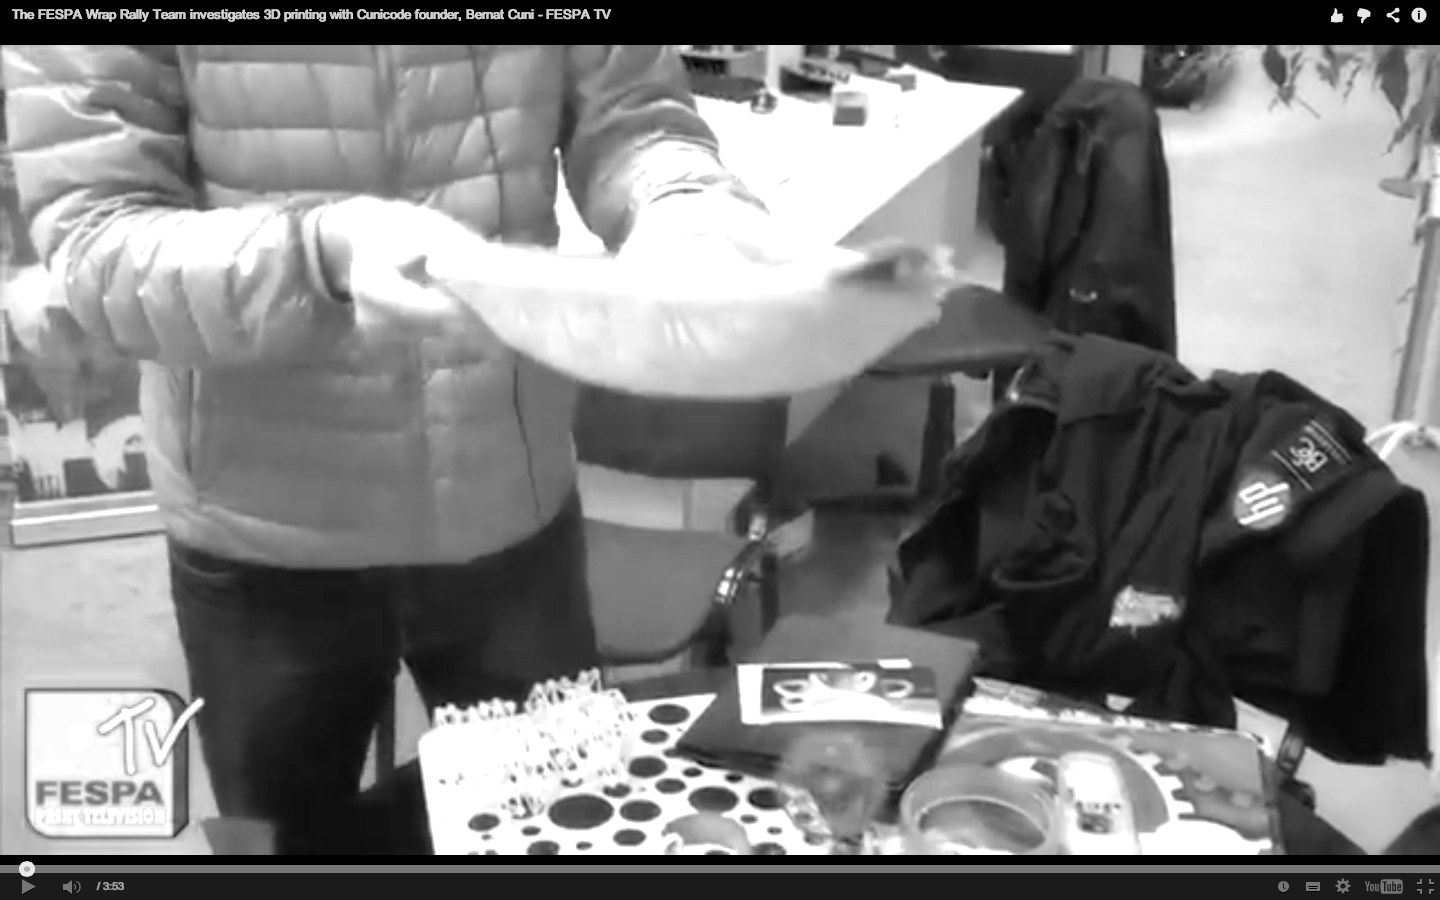
Thoughts on 3DPrinting | interview FESPA
Sharing some thoughts on 3D-Printing in a video-interview with FESPA (The Federation of Screen and Digital Printers Associations) for the FespaDigital-2012 event.
Sharing some thoughts on 3D-Printing in a video-interview with FESPA (The Federation of Screen and Digital Printers Associations) for the FespaDigital-2012 event.
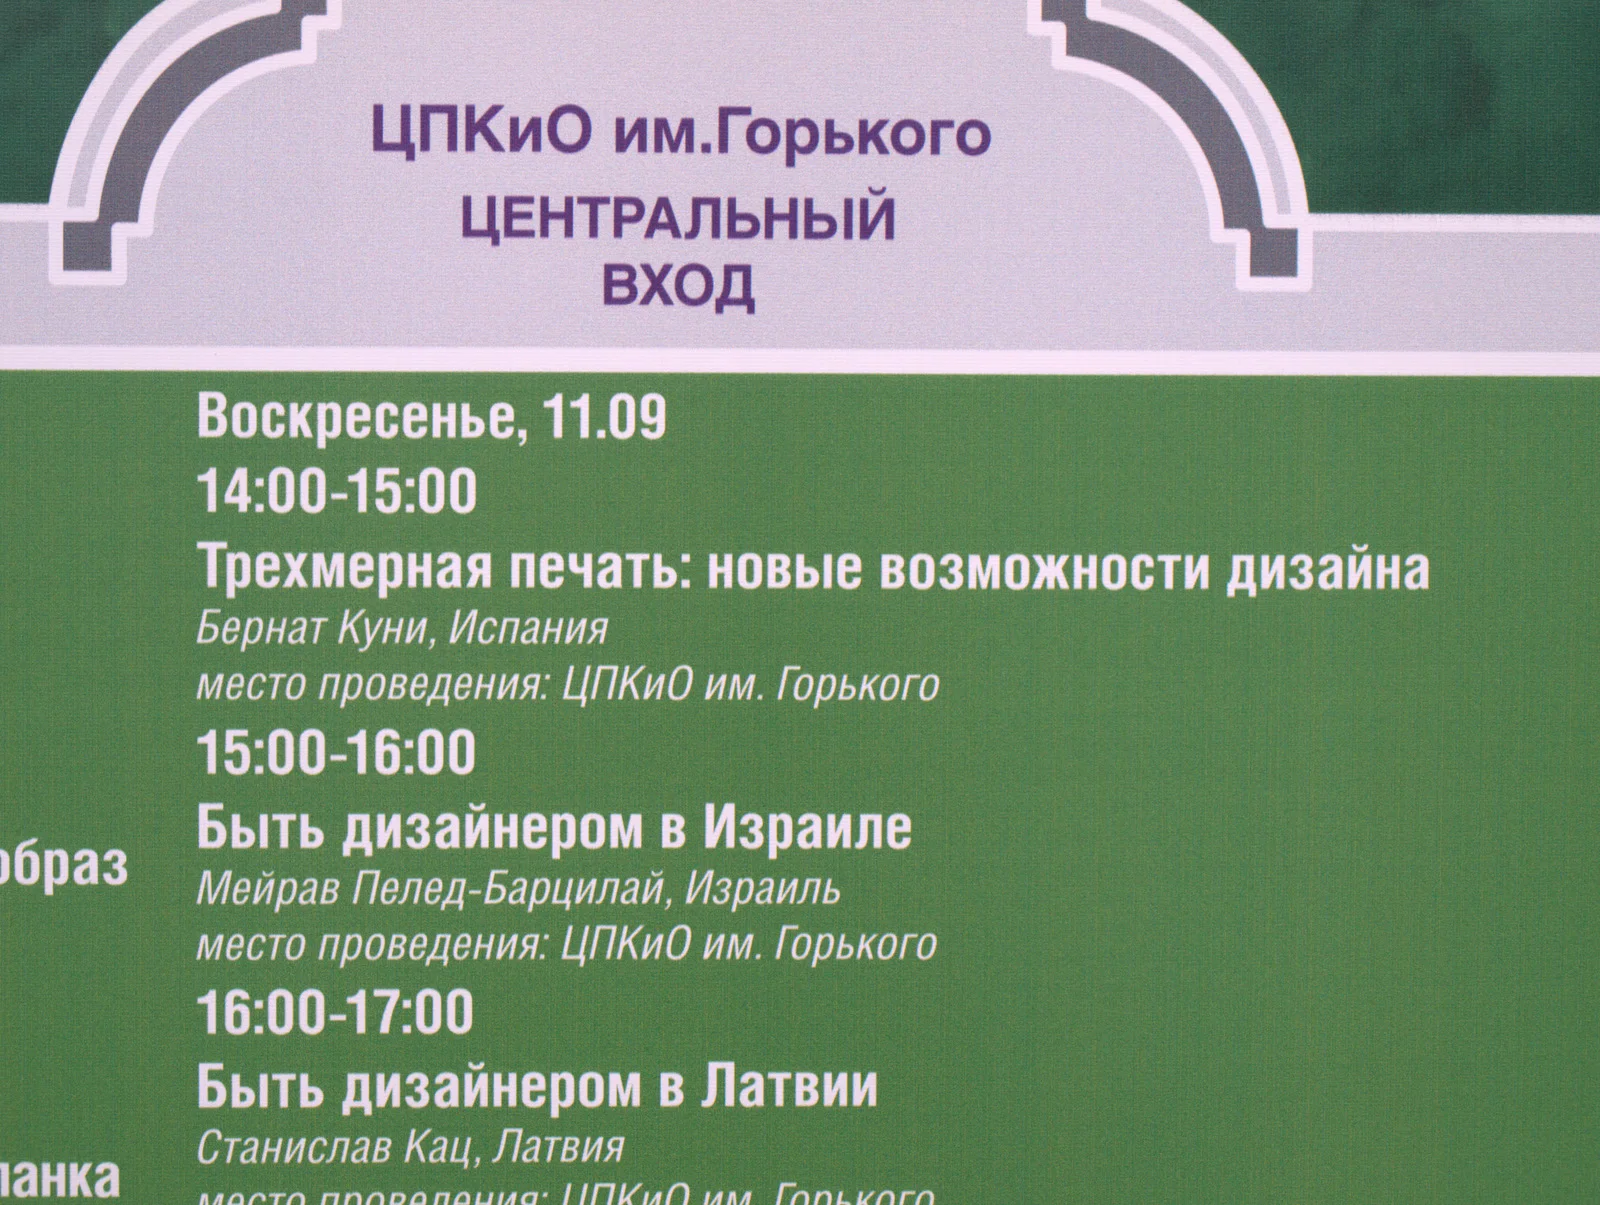
Exhibition & Talk at DesignAct festival | Moscow
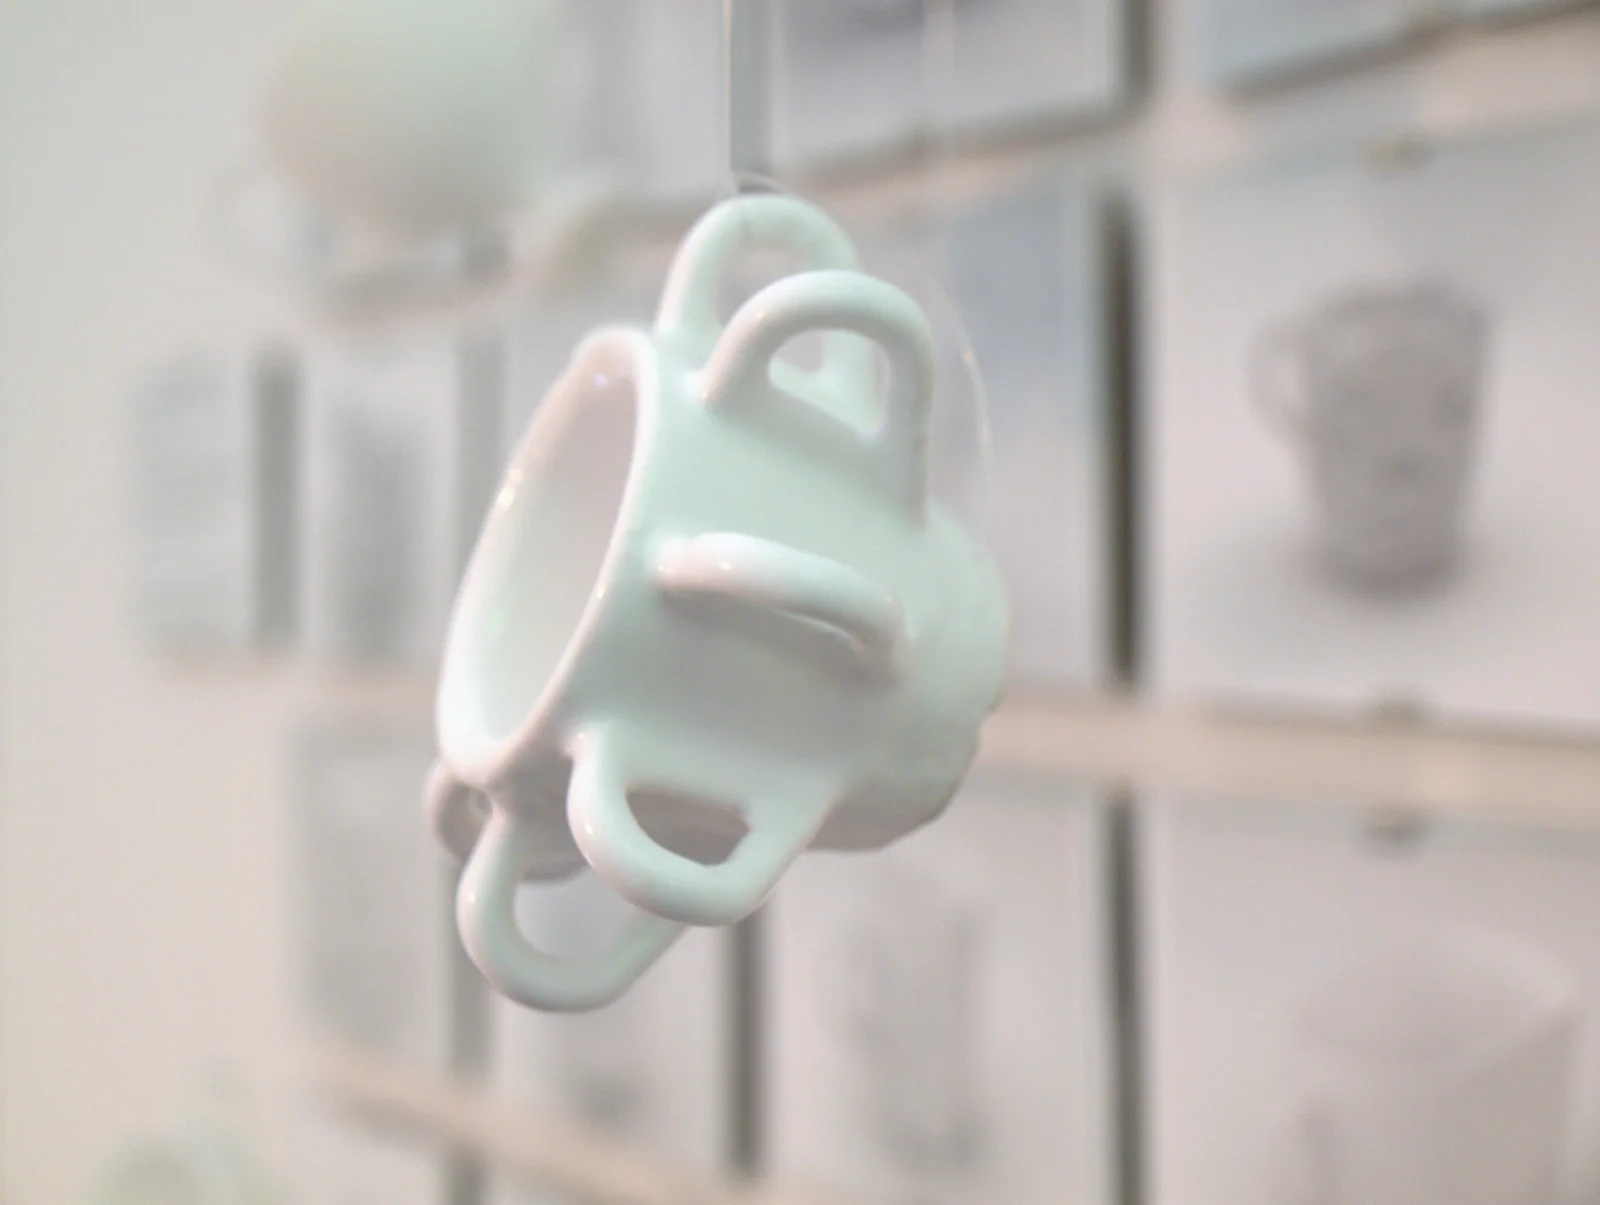
We spent 4 fantastic days in Moscow sharing the passion for Design & 3D-Print during the DesignAct festival, We presented the Stellate Collection & the Coffee Cups Project, and we even appeared at the 21:00 news!

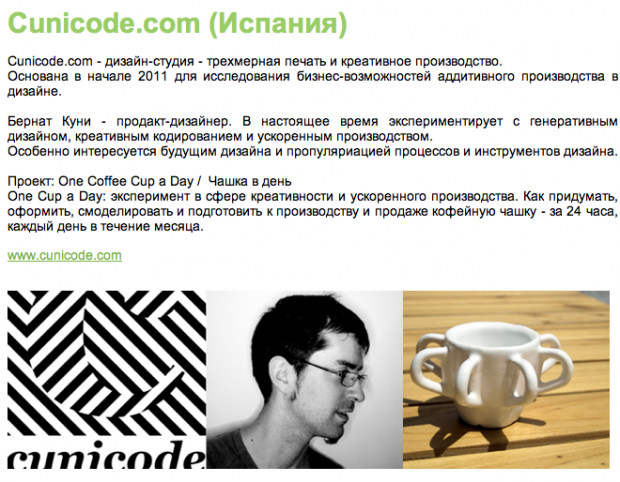
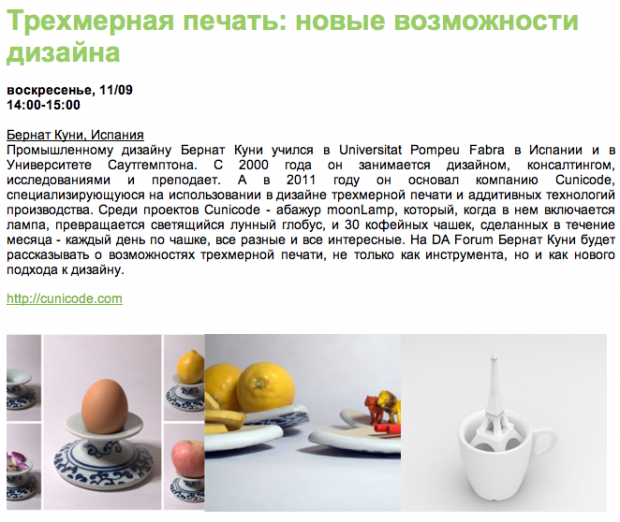
Design Act, the International Design Festival will be held in Gorky Park. This year is the 5th season of the festival. Over 200 000 people have already been there. Now it’s your turn to come and join this global event!
The exhibition had a good balance of commercial and experimental pieces,
The forum was a great place to exchange ideas. I spoke about the opportunities that additive manufacturing and digital fabrication offer to the design industry,
The market had a beautiful display of contemporary creativity and it was a good place to discover nice products and people


We met the great people from Tynts | nechegonadet | ArchPole | StreetKit | oodesign | maajo | Meirav Barzilay | buddhi | 360 | ineke otte | estorama | vot-tak